Red rose petals are an organic way to create dusty pink and blush hues for your textile and craft projects. No roses in your garden, no problem! Recycling & repurposing a bouquet with roses is an amazing way to enjoy the beauty of flowers long after they have faded. This tutorial will show you how to brew color from wilting red roses, as well as how to dye paper & the resulting color swatch samples (wet strength tissue paper) with various pre-mordants.
Immersion-Dyed Roses
Faded rose petals are the perfect flower to create reds & pinks with an immersion dyeing technique for your textiles. Recycling & repurposing a bouquet of roses, or straight from your summer garden, is an amazing way to enjoy the beauty of flowers long after they have faded. This tutorial will show you how to immersion dye with rose petals on cotton using white vinegar & iron water to modify the colors.
Steam-Dyed Tulips
Tulip petals are a wonderful flower to create reds & pinks with a steam dyeing technique for your textiles, aka eco-dyeing. Recycling & repurposing a bouquet of tulips, or straight from your spring garden, is an amazing way to enjoy the beauty of flowers long after they have faded. This tutorial will show you how to steam dye with tulip petals on silk using white vinegar & iron water to modify the colors.
Dahlia Dye
Dahlia flowers are a natural way to create golden yellow hues for your textile and craft projects. If it's not the season for dahlias, no problem! Recycling & repurposing a bouquet with dahlias is an amazing way to enjoy the beauty of flowers long after they have faded. You could say it's twice as nice! This tutorial will show you how to brew dyes from wilting dahlia flowers, as well as the resulting color swatch samples (cotton & silk) with various pre-mordants.
Blue Spruce Dye
Do you have blue spruce in your neighborhood? If so, grab yourself a few boughs and chop them up in your dye pot! By adding iron water to your brew, you can coax out the bluish tint from this evergreen to create gorgeous cool grays. This tutorial will show you how to identify & brew dye from a blue spruce, shift color with iron water and the resulting color swatch samples (cotton, bamboo & silk) with various mordants.
Pine & Spruce Branch Dye
Picking up downed evergreen branches of pine & spruce trees not only cleans up your yard, but can be repurposed into some beautiful colors in your dye pot. The natural tannin in the branches will give you a beige color on textile, but with the addition of all-in-one mordant of alum & iron water, you can achieve olive greens and rich browns as well. This tutorial will show you how to brew dye from foraged pine & spruce branches and expand your palette with an all-in-one mordant technique, plus the resulting color swatch samples (cotton & silk).
Birch Bark Dye
Join me on a foraging trip (Part 2) in the beautiful mountains of Central Idaho to search for color from birch trees. Learn to identify and differentiate birch from aspen and how to ethically collect birch bark for your dye pot. The natural tannins in bark bond wonderfully with textile and create a range of beige and tan colors. After exploring the landscape of the Big Wood River in search of birch, this tutorial will show you how to brew dye with the resulting color swatch samples (cotton & silk) with various mordants. As an added bonus, you will learn how to create an all-in-one mordant within the dye itself to expand your color palette.
Pine & Spruce Cone Dye
Join me on a foraging trip (Part 1) in the beautiful mountains of Central Idaho to search for color from conifer trees. Learn to identify pine and spruce cones and how to ethically collect them for your dye pot. The tannins in cones bond wonderfully with textile and create a range of beige colors with orange and pink hues. After exploring the landscape of the Sawtooth and Boulder mountains in search of cones, this tutorial will show you how to brew dye with the resulting color swatch samples (cotton & silk) with various mordants.
Noble Fir Dye
If you love having fresh evergreen in your home for holiday decorations, keep that aroma brewing by recycling the boughs in your dye pot - needles and all! The natural tannin in the branches will give you a beige color on textile, but with an iron water shift, you can achieve deep grays as well. This tutorial will show you how to brew dye from a noble fir Christmas tree and shift color with iron water, plus the resulting color swatch samples (cotton, bamboo, linen & silk) with various mordants.
Cranberry Dye
Cranberries are a seasonal fruit that are delicious in sauce, drinks AND your dye pot! Simply simmering these vibrant berries will create a gorgeous pink color to use in your textile projects at the holidays and beyond. This tutorial will show you how to brew dye from cranberries with the resulting color swatch samples (cotton & silk) with various mordants.
Pomegranate Skin Dye & Mordant
Pomegranate seeds are a holiday treat, but don't throw away those skins! The peel is full of tannin and is a great way to pretreat your textiles, especially plant (cellulose) fibers like cotton, linen, bamboo and hemp, to create stronger color bonds with natural dyes. The 'mordant' process is an extra, but important, step to help organic color last longer and protect it from fading with exposure to light and wash. The process is as easy as simmering a pot of a water and soaking your textile for an hour. And, if you love yellow, pomegranate skins make a rich golden dye with a longer soak and some extra peels. This video tutorial will show you how to tannin mordant cellulose fibers with the skins, as well as create a long-lasting yellow color for your textiles.
Black Walnut Dye
If you are lucky enough to have a black walnut tree in your midst, you can add rich browns to your dye pot in autumn. After the hulls fall from the tree, forage them while green, or even collect them after they turn black, to create a tannin rich dye to use for coloring or a mordant. You can even make extremely dark hues with iron water that are as close to black as you will get in the natural dye world. This tutorial will show you how to brew dye from black walnut hulls on the stove, as well as a cold 'sun' tea dye from the shells. You will see the resulting color swatch samples (cotton & silk) with various mordants and the impact of shifting the color with an iron water bath.
Alum Mordant
Alum is an easy way to pretreat your textiles to create stronger color bonds with natural dyes. The 'mordant' process is an extra, but important, step to help organic color last longer and protect it from fading with exposure to light and wash. Typically found in your grocery spice aisle, alum is a mineral most often used by natural dyers on its own or in combination with other mordants such as tannin. The process is as easy as simmering a pot of a water and soaking your textile for an hour. This video tutorial will show you how to make an alum bath, as well as the use of cream of tartar for protein fibers.
Iron Water
Iron is a great way to shift your naturally dyed fiber to darker shades quickly and easily. Make your own homemade iron water with 3 simple ingredients: rusty nails, white vinegar and water. After a few weeks, your iron water is ready to go! You only need a splash, so store it away to use any time you are looking for darker shades including gray and black. This video tutorial will show you how to make and use iron water, as well as the resulting color swatch samples of 6 different natural dyes on cotton.
Color Quest
Welcome to my new YouTube channel, Margaret Byrd:Color Quest as I move my Trail Tales blog to a vlog! Every Friday, I release new video content focused on the amazing world of natural color. Join me as I explore ways to forage and invite organic color into my creative practice.
The Art of Craft
Small craft advisory
As an artist, I aspire to be crafty.
Forget the misguided, and tragically oppressive Western narrative of ‘high art’ as somehow ‘enlightened’ and more valuable than the exquisite beauty found across all creative expression labeled as ‘craft’.
If you can translate an idea from mind to hand, the material is immaterial – you are an artist - plain and simple.
My creative curiosity has led me down a crafty path or two, and I’m now enamored with one diversion so often associated with handiwork: natural dyeing.
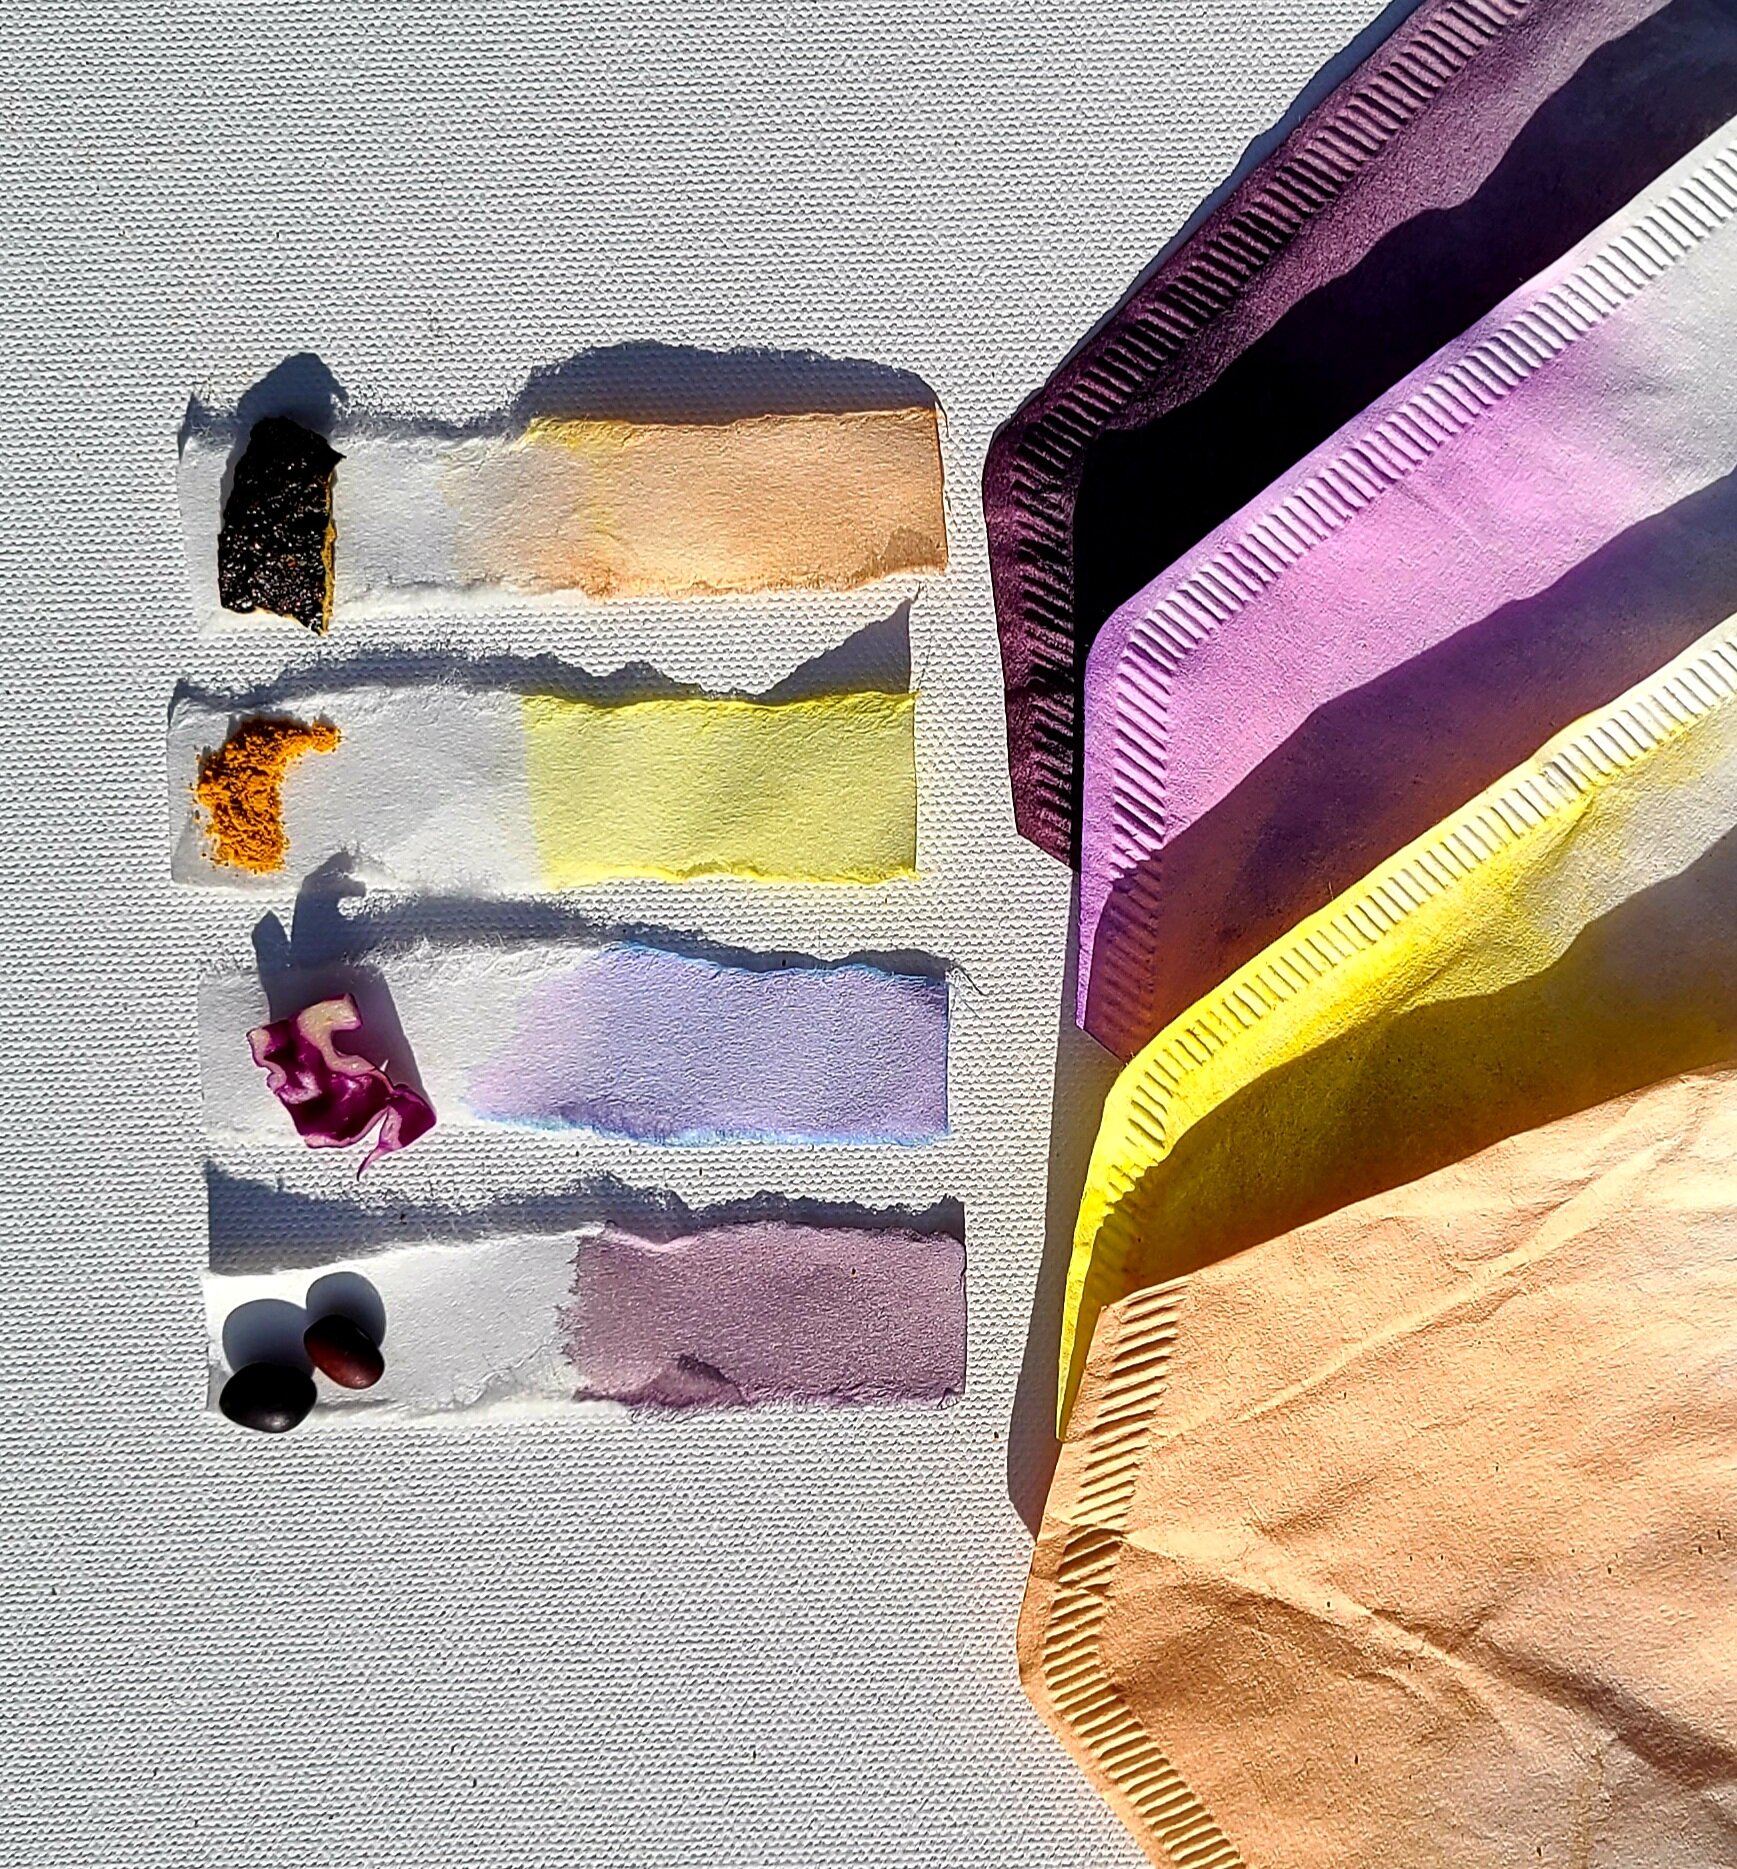
Some of my kitchen favorites for natural dye: avocado, turmeric, red cabbage and black bean.
While I could fight against the notion that this diminishes the value of my art, why would I entertain such a silly thought?
Nope. I choose to celebrate, my artist friends, so let’s get crafting with natural color!
Color classics
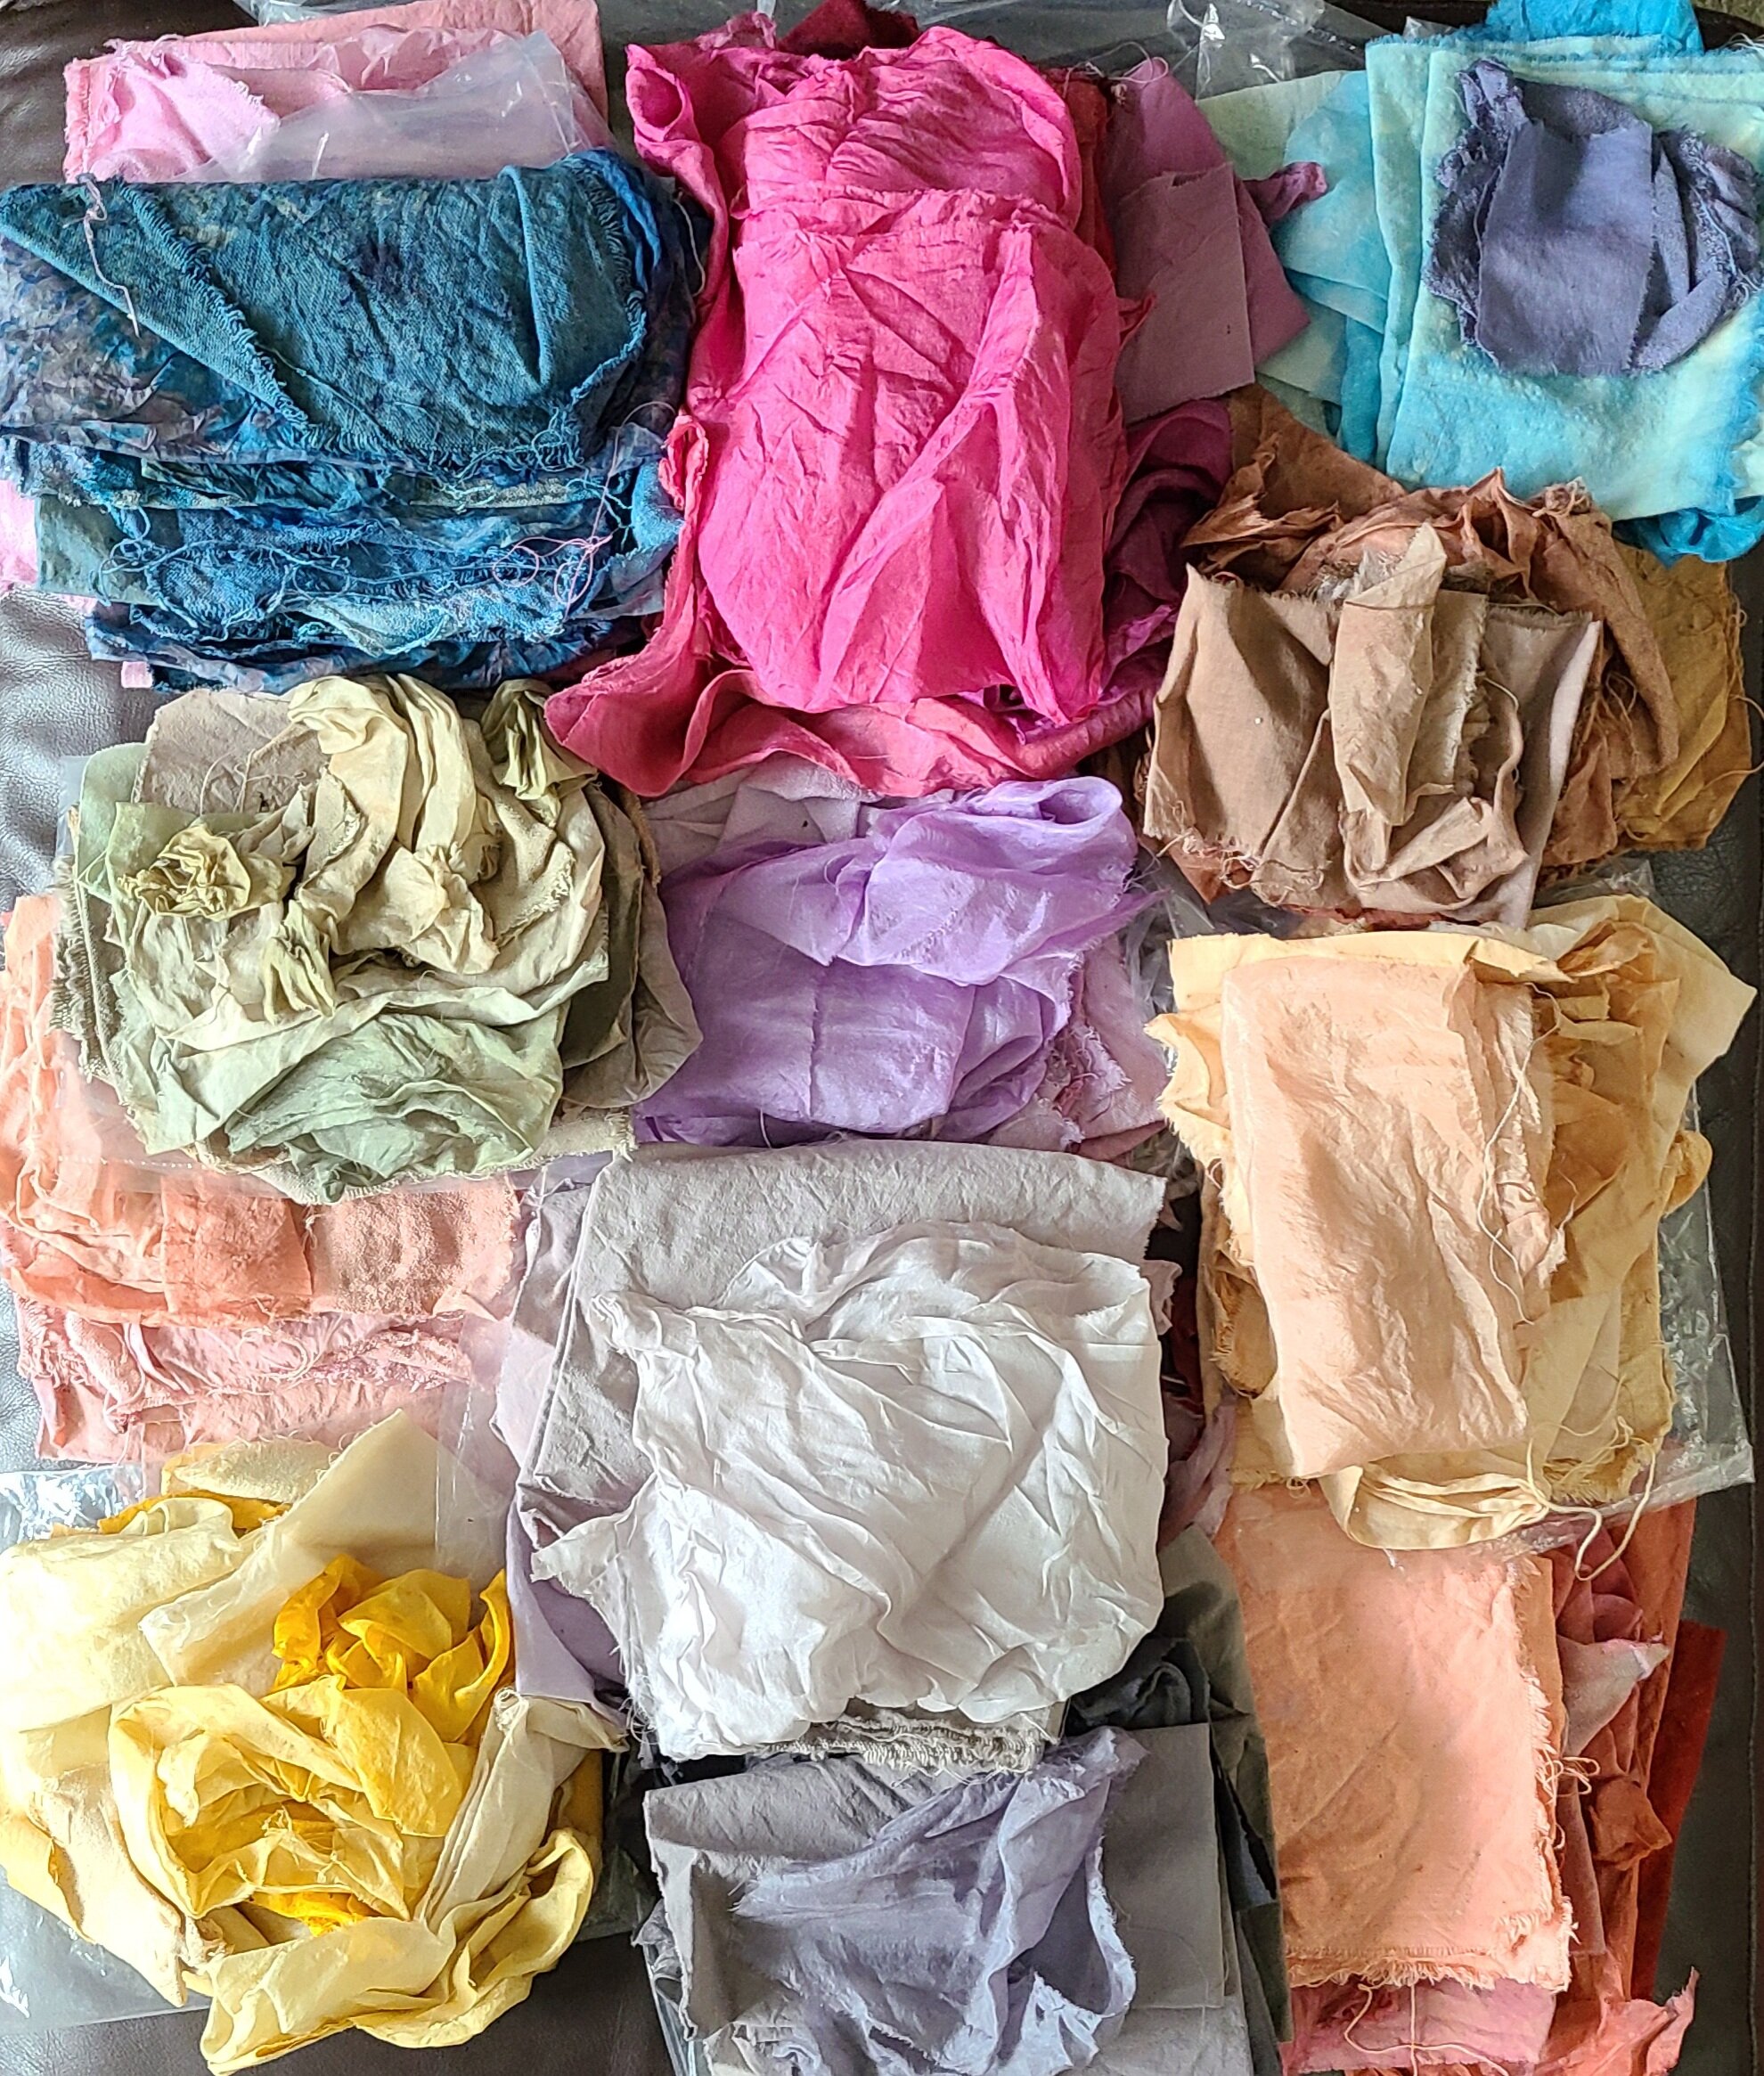
Focusing on colors from nature in #The100DayProject has filled my fridge with an incredible rainbow of botanical dyes.

Dyes brewed from foraged plants and food scraps during #The100DayProject.
Every time I find a new plant to brew, I add to my collection. When I see a color missing, I go searching for a plant. It is a never-ending exploratory cycle.

10 dye plants foraged from Tambark Park and my garden waste to study local flora colors.
As I shared my project, and the art I created with these dyes, I could hear the buzz all around me as people became curious themselves. Certainly interested, and maybe even inspired, to learn about natural dyes.
I get this. I have a history of being intrigued myself. It’s how this passion for organic color grew and how I learned what I know so far. Ironically, it seems the more you know, the more you want to know.
Having had many of the same questions when I started my love affair with nature’s palette in 2017, I have been searching high and low for answers ever since.

When I learned from a Dutch artist that seaweed was a sustainable source of dye, I headed to Iceland to investigate.
And, because sharing is caring, I’m very excited to tell you a secret I’ve been keeping all to myself:
Starting in August 2020, I will be releasing short tutorial videos and mini-courses all about the incredible world of natural color. My intention is to build a place where you can easily find the basics to get you inspired to add color to your life naturally.

Soon to be released YouTube channel, Cookin’ Color, with short video tutorials on organic dyes, August 2020.
The topic is HUGE. There are so many options and different approaches to extracting color, plus a multitude of ways to use it.
For me, organic color has been an integral part of my installation practice, and more recently my mixed media work. But a beautiful aspect of natural color is that it is available to everyone, no matter where you consider yourself on the art/craft spectrum.

Bioplastics cooked and cured with natural dyes in my kitchen studio in June 2020.
And, the botanical dye in my fridge right now is a perfect example of the countless ways we can weave natural color into almost everything.
Nature’s bounty
Finding a way to create color in an ephemeral installation without hurting an environment is how I got hooked on natural dyes. But as my #100DaysOfNaturesColors meandered its way through botanical dyes and earth pigments, I could clearly see just how many different ways I have been exploring color from nature. Maybe one or more of these will strike a creative chord with you too!
TEXTILE
Probably the most obvious and popular use of natural dyes is to create sumptuous hues for fabric. With a growing interest of sustainability in fashion, botanical colors are popping up from head to toe. If you’ve got natural fibers in your closet (cotton, hemp, silk, wool), you can dye organically – the options are endless.
Textiles of wool, silk, cotton and bamboo hand-dyed in Oaxaca exclusively with organic matter.
My first on-line workshop will be on how to create an ombre-dyed scarf from foods in your kitchen, and this fall, I will be teaching a similar technique using earth pigments. Incorporating these rich colors into a wardrobe is a delicious way to get your art out of the house.
However, if knitting or weaving is more your speed, soaking yarn, string or ribbon in a batch of botanicals can create subtle sweetness. Just look at the wonder of this wool I dyed in Mexico.

Wood hand-dyed in organic matter including indigo, muicle, pericon and cochineal in Oaxaca, Mexico.
While I preferred to use this fiber for installation, imagine a hat, scarf, mittens or sweater with that special colorful touch?
But who says you have to wear hand-dyed textiles? My mom was an avid quilter which I’m certain has influenced my mixed media textile pieces and love of squares.
Naturally dyed textile piece, Blossom, created while on residency in Oaxaca, Mexico, March 2020.
How special it would have been to forage with my mom and organically dye fabric swatches for her to sew into her quilt creations. Keep that in mind for the quilters in your life.
PAPER
Textile’s extended fiber family is paper. The delicate translucency of paper has intrigued me for quite some time, both for sculptural and 2D applications. In Oaxaca, I first tested how wet strength fibers like mulberry and tissue would hold the colors I had brewed, and it worked like a charm.
First time hand-dyeing paper with plant matter in Oaxaca, Mexico, March 2020.
So, one chunk of 10 days during #The100DayProject, I focused on creating collage with these dyed papers. The variations of color, especially when layering, felt closely tied to the depth I love to create with overlays of silk in my textile pieces.
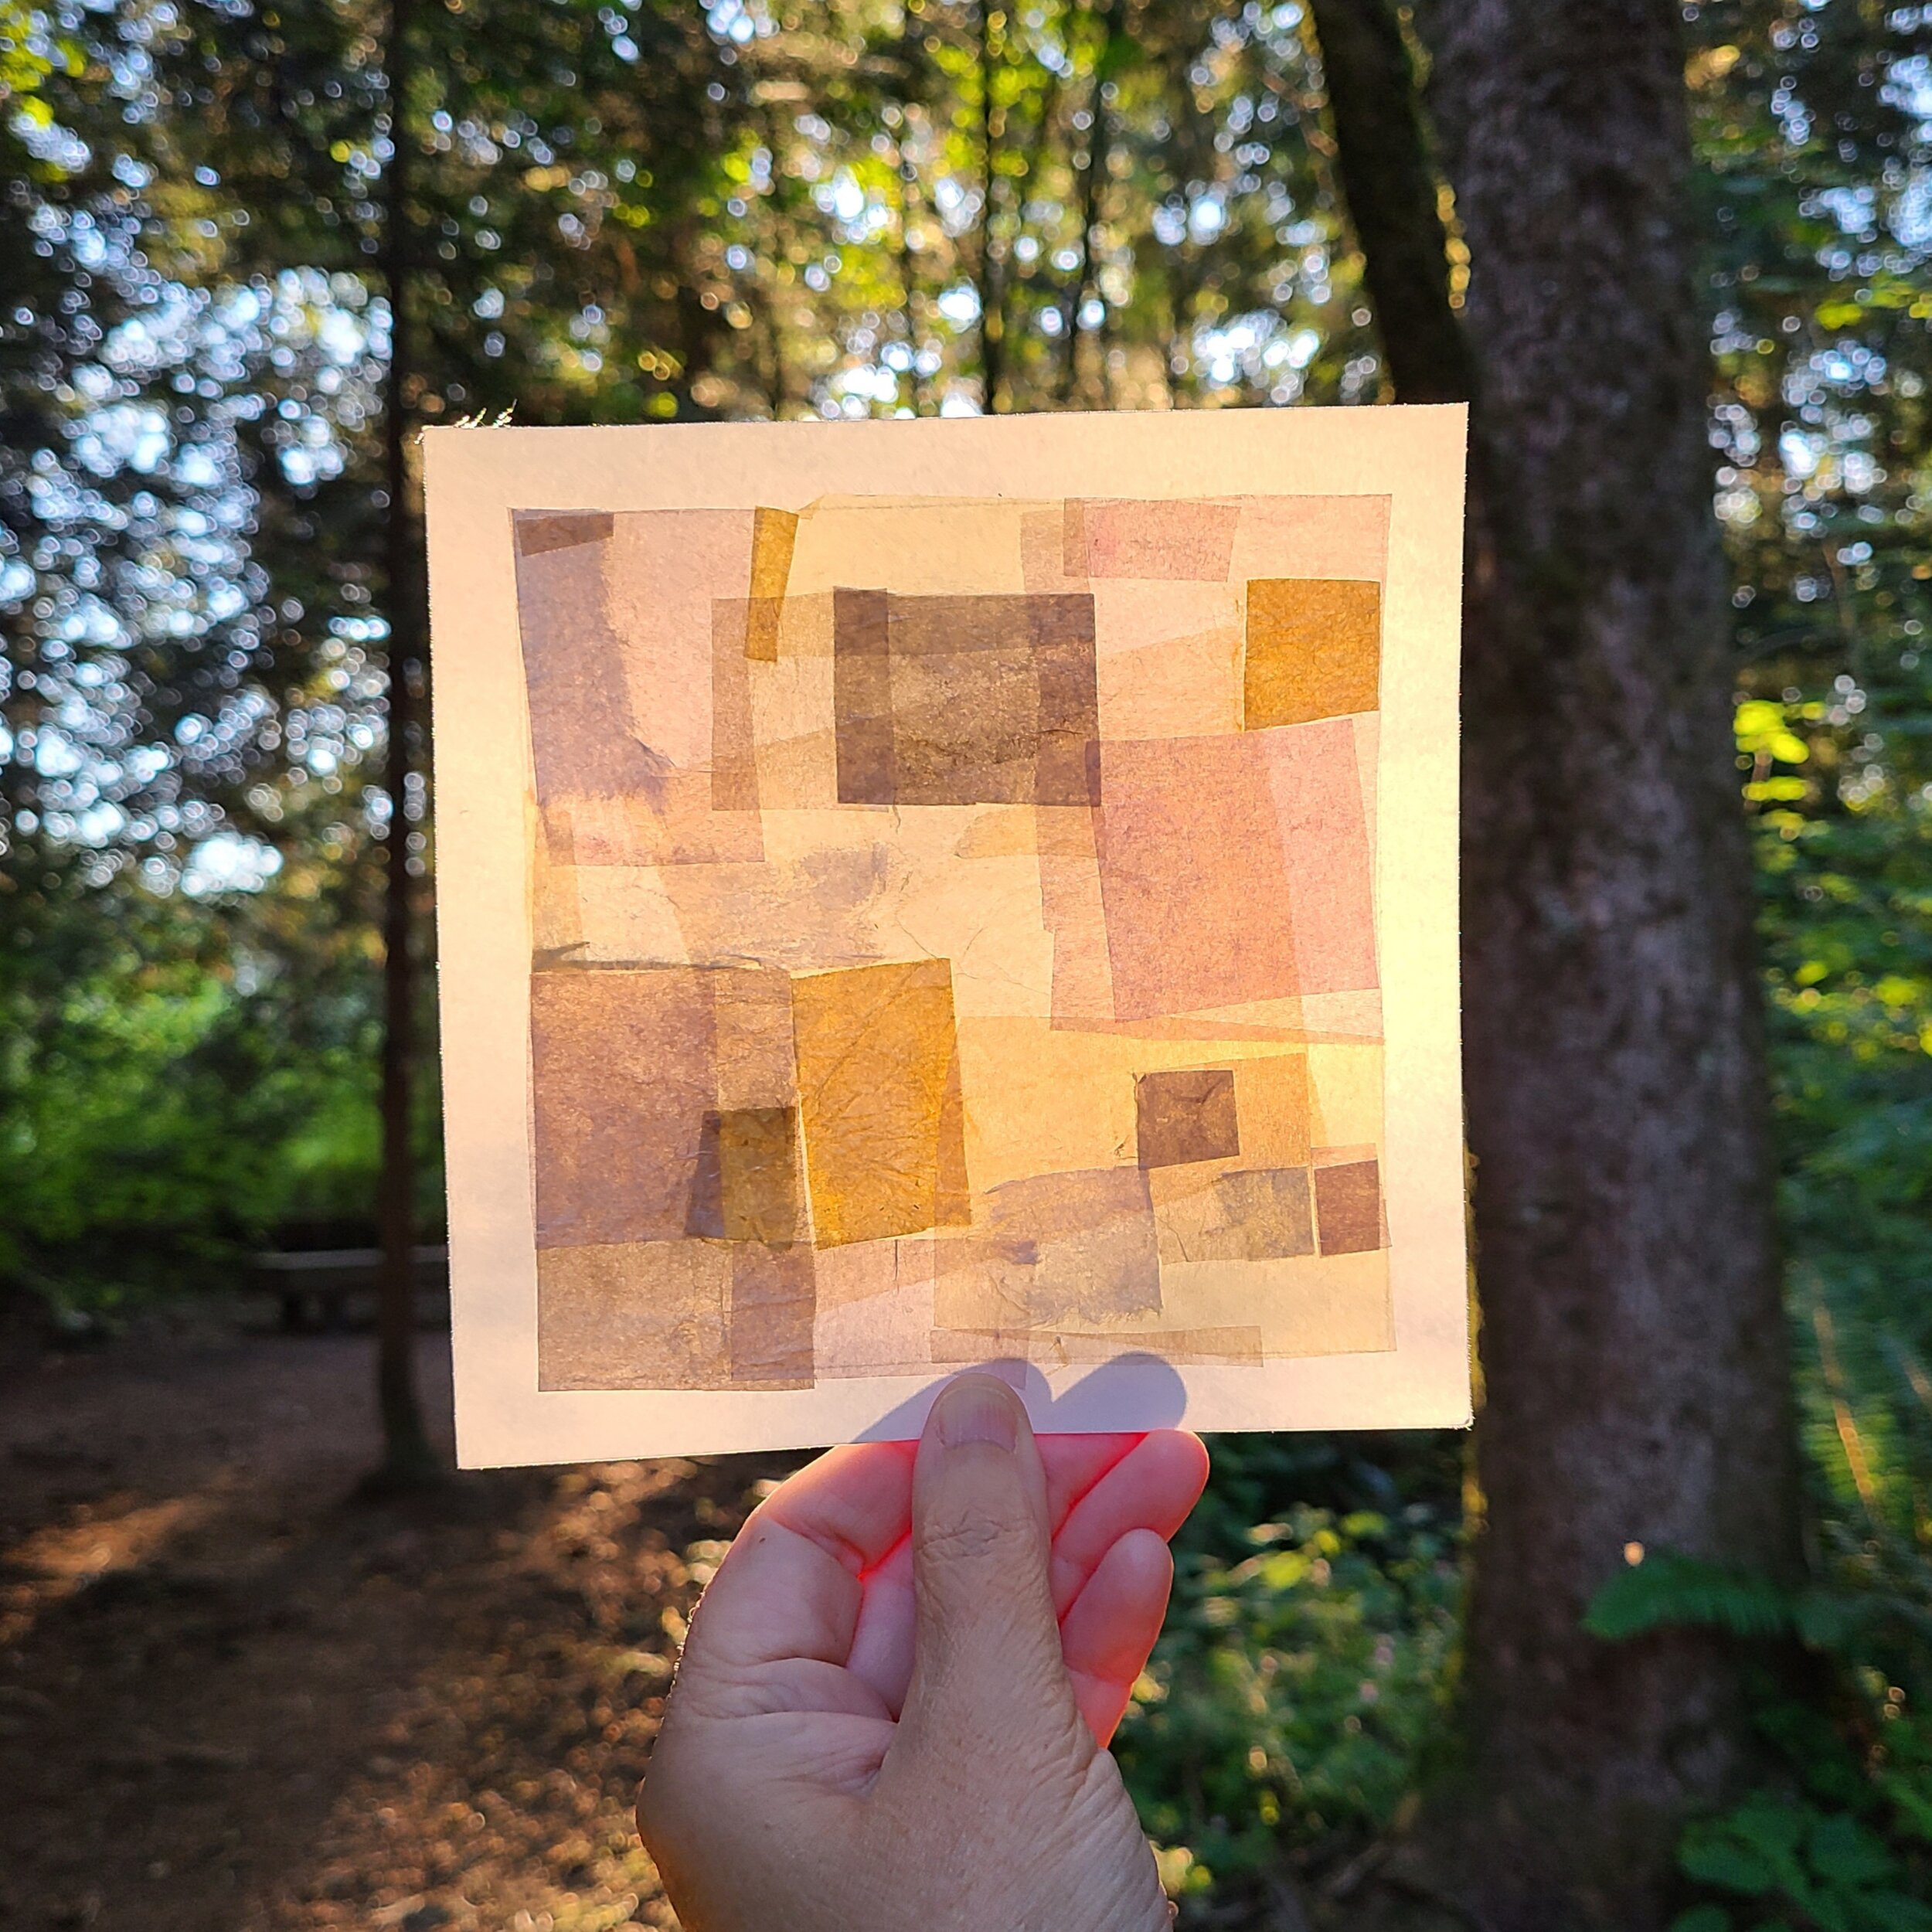
Hand-dyed paper collage backlit in Tambark Park, made exclusively from organic dyes foraged in Oaxaca, Mexico.
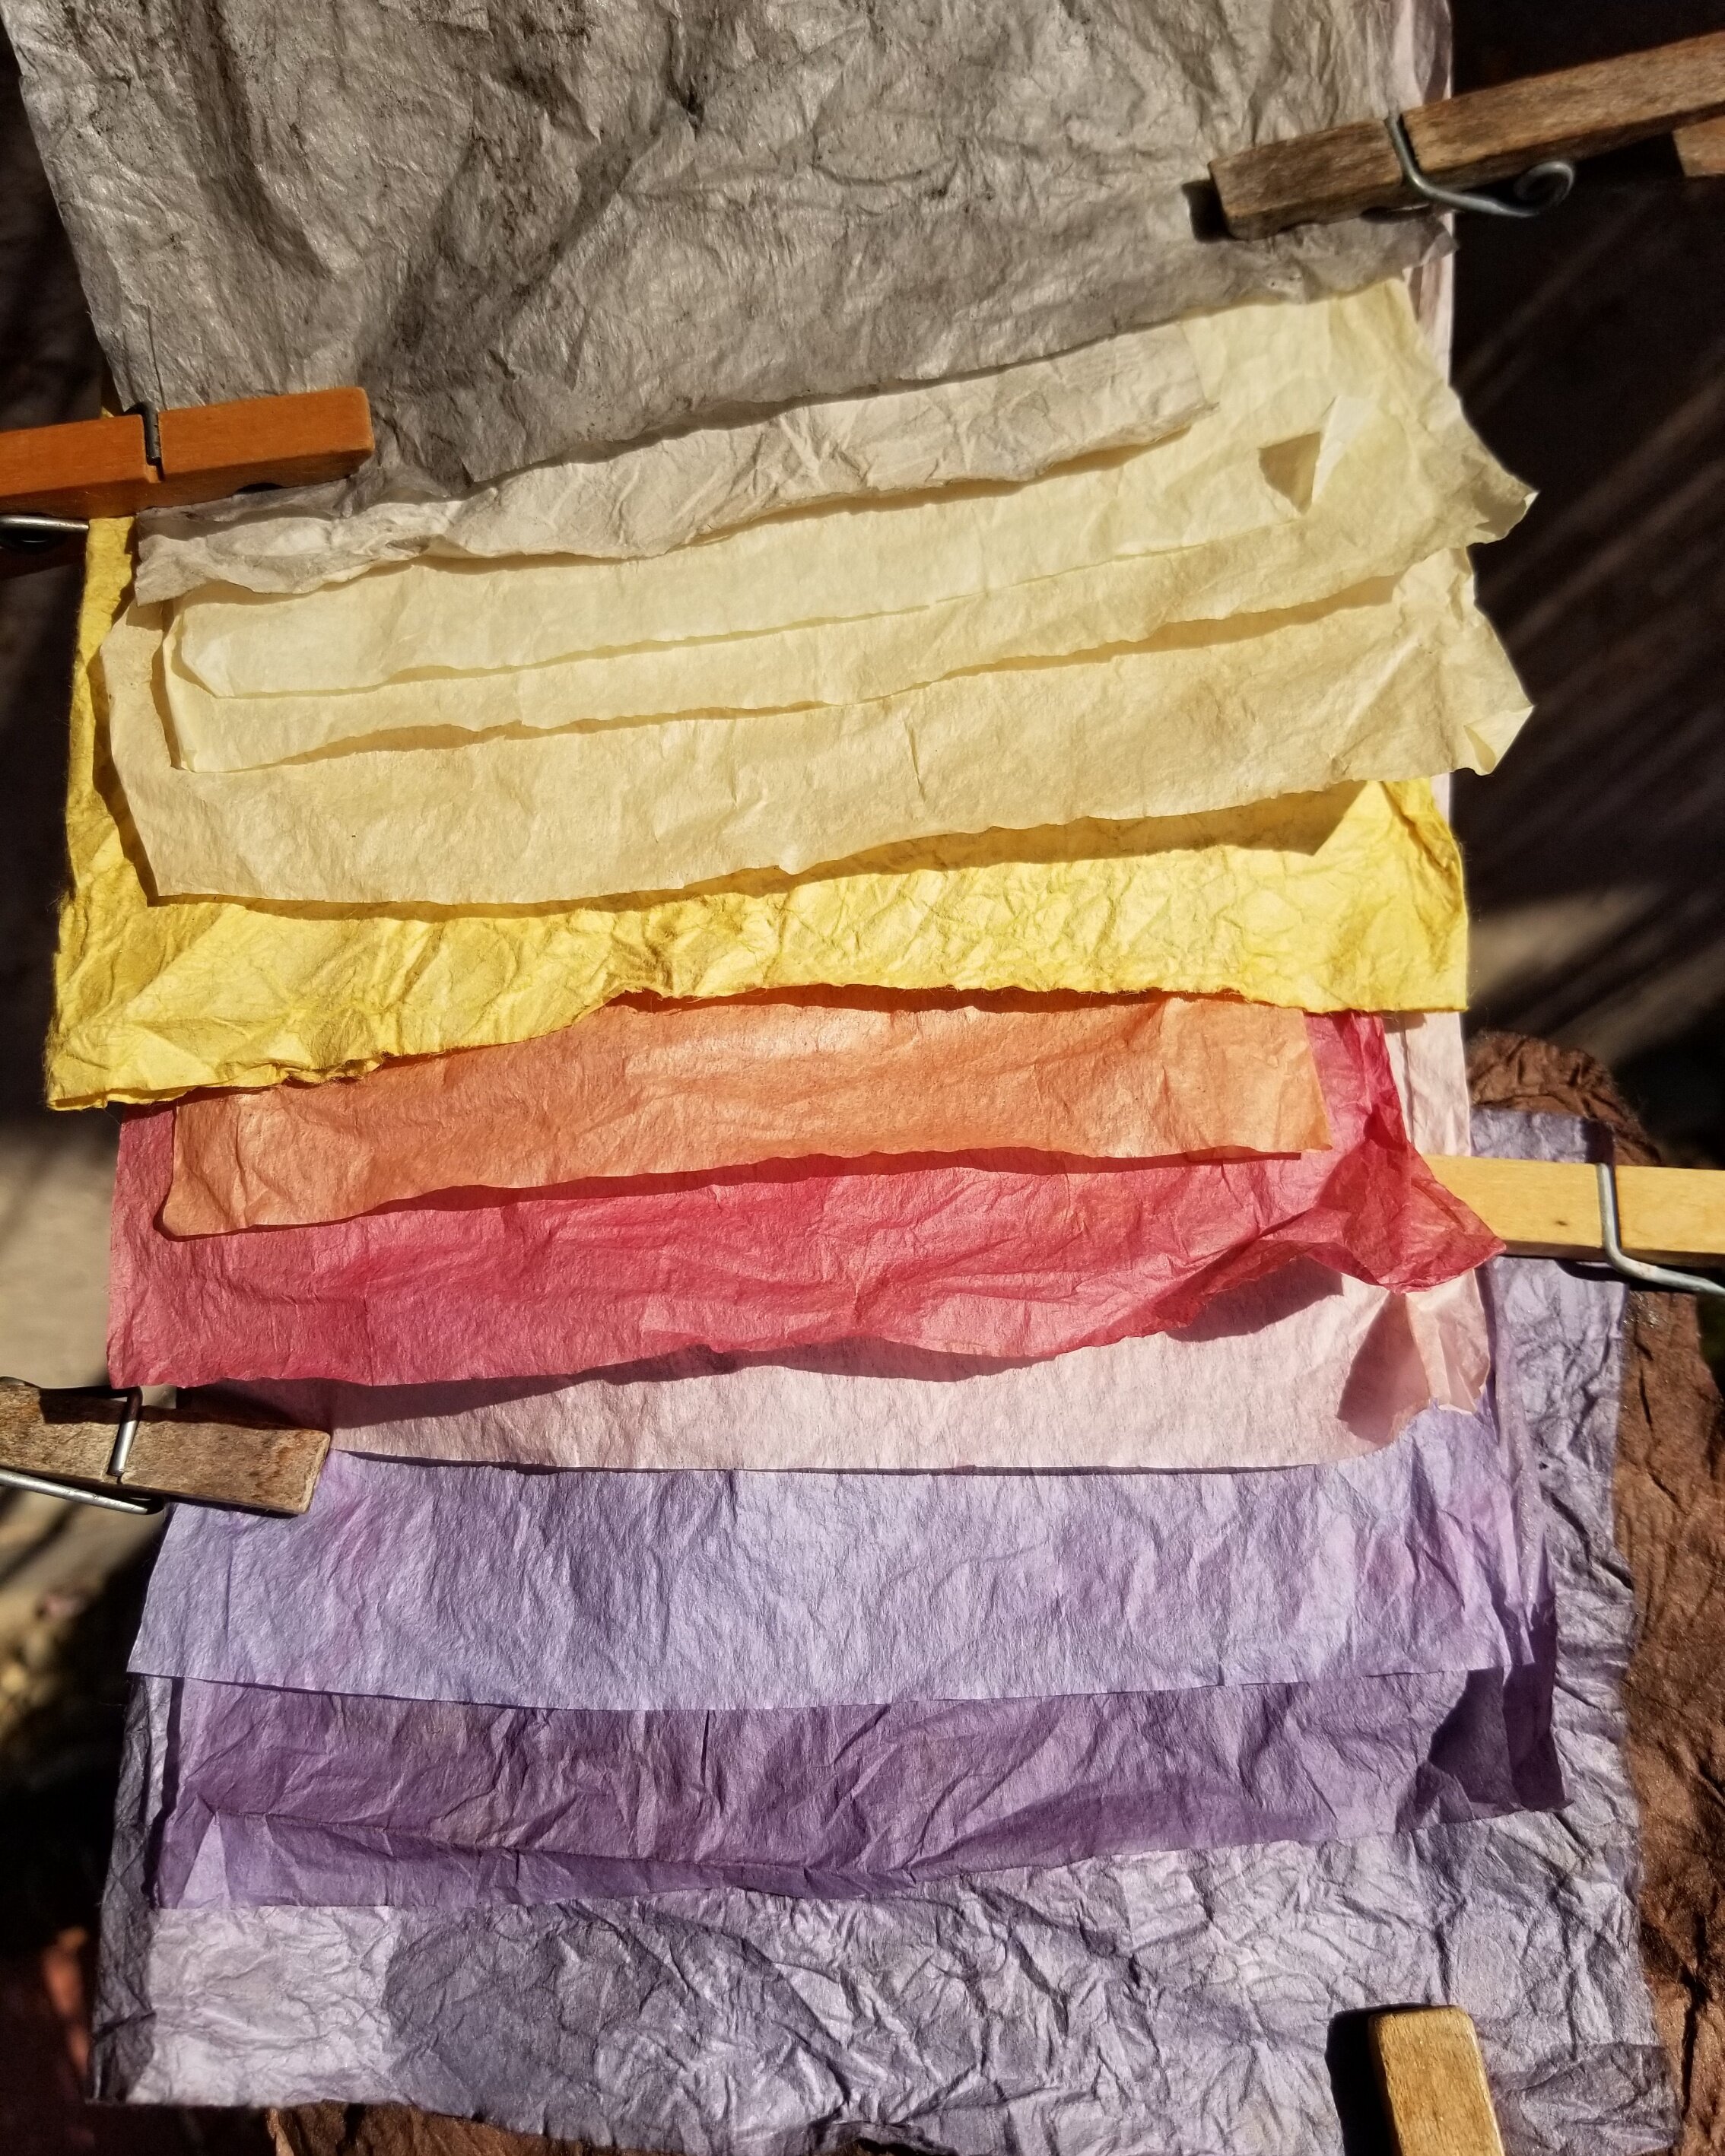
Feeling inspired, I foraged local ‘weeds’ in my beloved Tambark Park the last 10 days of the project and made a new rainbow stock of colorful paper from the PNW.
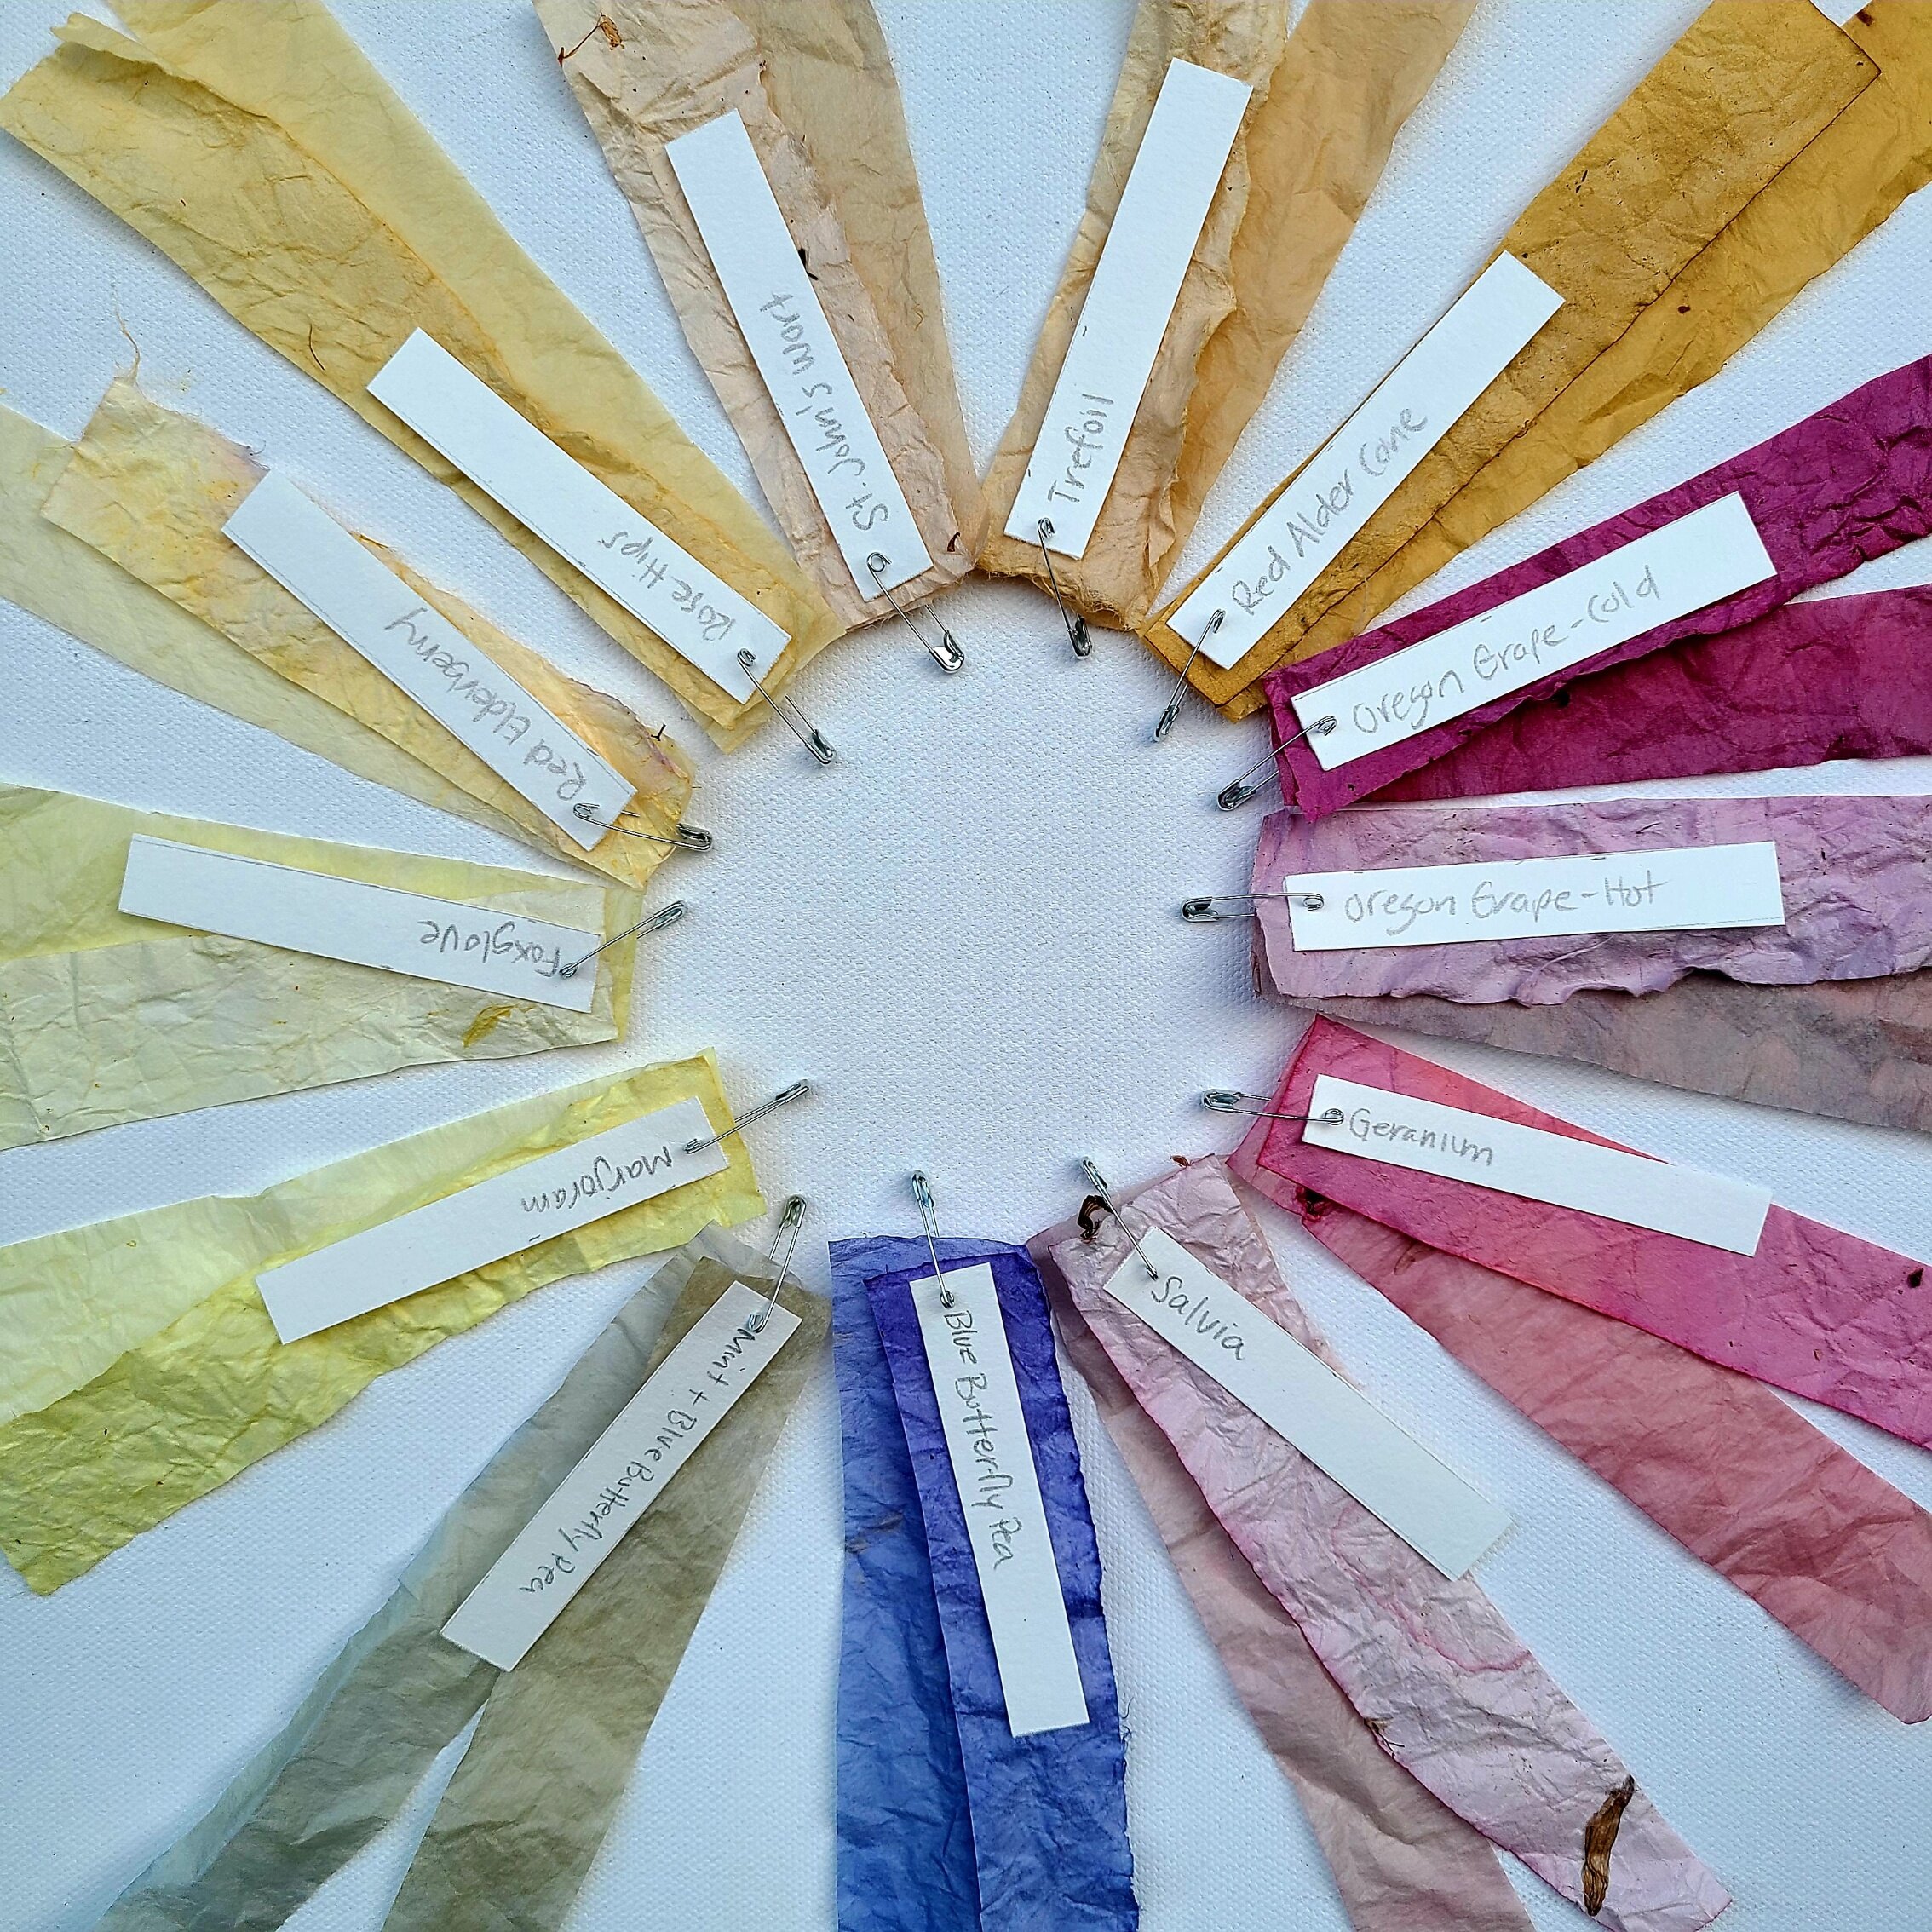
Paper samples of natural dyes brewed from foraged plants in my neighborhood. Only blue butterfly pea was from my kitchen!
What’s wonderful about paper is its versatility across several art disciplines, and a true staple in many craft projects. Why not make hand-dyed paper with plants foraged from your neighborhood the next time the scissors and glue need some exercise?
INK
Dyeing paper is one way to spread some of nature’s colors around, but making ink turns just about any organic matter into a medium for drawing and watercolor fun.
I simply poured the dyes I brewed from foraged plants in Iceland and Mexico on paper, but learning how to make ink specifically was yet another way to expand my natural color wheel during the last 100 days.

Testing inks made from avocado skin and red cabbage during #The100DayProject.
I even made blue ink with my cherished blue butterfly pea blossoms for the first time, one of the most elusive colors of nature.
Watch out - lake pigments might be just around the next corner!
KITCHEN KRAFT
While all of the above may result in time at a craft table, a stovetop is still a critical element in a studio of natural dyes. Therefore, it’s no surprise that crafts of the kitchen can also add a splash of organic color.
Much of my installation work was born in the kitchen - infused ice, mung bean and playdough have been some of my edible shining stars.

Mung bean string installation naturally dyed with kitchen scraps in Sayulita, Mexico, December 2018.
Brewing organic dyes as natural food coloring for baking, cooking and blended drinks is certainly a fun way to add color in the kitchen. At the very least, you can start with next year’s Easter eggs having that natural color vibe.

This year’s Easter Eggs were dyed au naturel in turmeric, red beet, red cabbage, avocado and blue butterfly pea.
Plus, the kitchen is the perfect place to start playing with natural dyes in general. So many fruits/veggies, spices and even food scraps can make wonderful colors with very simple recipes.
In case you missed it this spring, download a copy of my Cookin’ Color brew booklet with a few of my favorite kitchen dye recipes, or better yet, sign up here for my 5 Days of Dye short video tutorial series releasing soon in a kitchen near you!
HEADING
Go ahead – call me crafty. I don’t mind at all.
To be honest, I question why any negative association became attached to a word that honors the vision and skill it takes to create beauty with your hands. To be an accomplished craftsperson is a lofty goal for any artist, and certainly one I aim for in my daily practice.
So, let’s keep spreading the art of craft in the world today!
The Tambark Ten
Frozen
The itch to travel runs deep in my veins. Funny enough, I’m also strangely content to hole up in my home for long stretches of time. Perhaps the balance for me is having an alternating pulse of movement and stillness.
With travel at a standstill, walking has become my movement of choice this spring, and as luck would have it, a small forested land sits opposite my house – Tambark Park. Daily excursions into the lush greenery spurred inspiration that translated into a surprisingly abundant creative surge starring two of my art darlings: ice and installation.

Shot glass ice installations popping up all over the place!
Boy, have I missed you two!
100 steps
Heading into the fourth 10-day chapter in #The100DayProject, I committed to placing installation right outside my front door. Until now, I had connected my installation practice solely to the exploration of distant lands – a way for me to personally interact with a landscape that provided wonder and inspiration.

One of many ice installations inspired by the breathtaking beauty of Iceland, December 2017.
You don’t have to go far in the PNW to have this sensory experience of marvel. Slowing down and opening up to my local surroundings brought me simple joy, loads of chuckles and some pretty sweet photos.

Organic dyes of avocado, turmeric and red cabbage melting in all their glory.
Let’s meander through these 10 days together.
Spark
Full disclosure - I stole the idea to place installation in Tambark Park.
As the world shut down in March, a beautiful trend of leaving small gifts of love and hope emerged. Walking the trails, I started noticing flowering plants that were not indigenous to the undergrowth.

Did forest elves plant these colorful treats amongst the cedars?
It took the brightly colored blooms at the base of several looming evergreens to notice a pattern: Someone was planting these in the darkest corners of the forest to offer light.
Another sweet offering scattered across the property were colorfully painted rocks. Spying the hidden stones became a visual treasure hunt I looked forward to playing every day.

Some of the painted treasures even had messages of hope.
These acts of kindness poked at my creativity, and so bloomed 10 days of installation.
Icy roads
Colors from nature first appeared in my art as a non-toxic way to tint the ice pieces I placed in Iceland in 2017 – the launching point for my installation practice.

Winter sunset through blue butterfly pea and red cabbage in the Westfjords of Iceland, December 2017.
Frozen climates eventually graduated to balmy locations to push the limits of ice as an ephemeral medium.
From tiny rental refrigerators to mobile coolers meant for chilling wine and travel snacks, I froze all kinds of shapes and sizes of water infused with plant-based organic dyes I brewed. I took some crazy pride in the lengths I went to transport my frozen works of art to their installation destination.

The ice cooler is a must-have on installation road trips, Maui June 2018.
Ice was an obvious choice for Tambark Park to stay true to my project of #100DaysOfNaturalColor. And to be honest, I never had it so easy! Using my full-sized freezer, packing a thermal lunch bag and walking no more than 10 minutes to place installation was an absolute dream.

The beauty of ombre dyes frozen in a full size freezer is pure magic.
Note to self: it doesn’t always have to be so difficult!
Secret garden
Tambark Park has a network of trails that meander through a mixed woodland. The search for more pristine locations, however, had me traipsing off the beaten path where I found some amazing nooks and crannies in the greenery.

Ice stack placed where few have ventured except for fallen trees.
I may have been only 20 feet from the footpath I walked every day, but it transported me back to the days of my childhood where we spent muggy summer days hunting for hidden places in the brush to build forts and play hide-n-seek.
Bumping into fellow hikers in Tambark Park while reemerging from the secret spaces always garnered a curious look and sometimes even a smile.
The green light
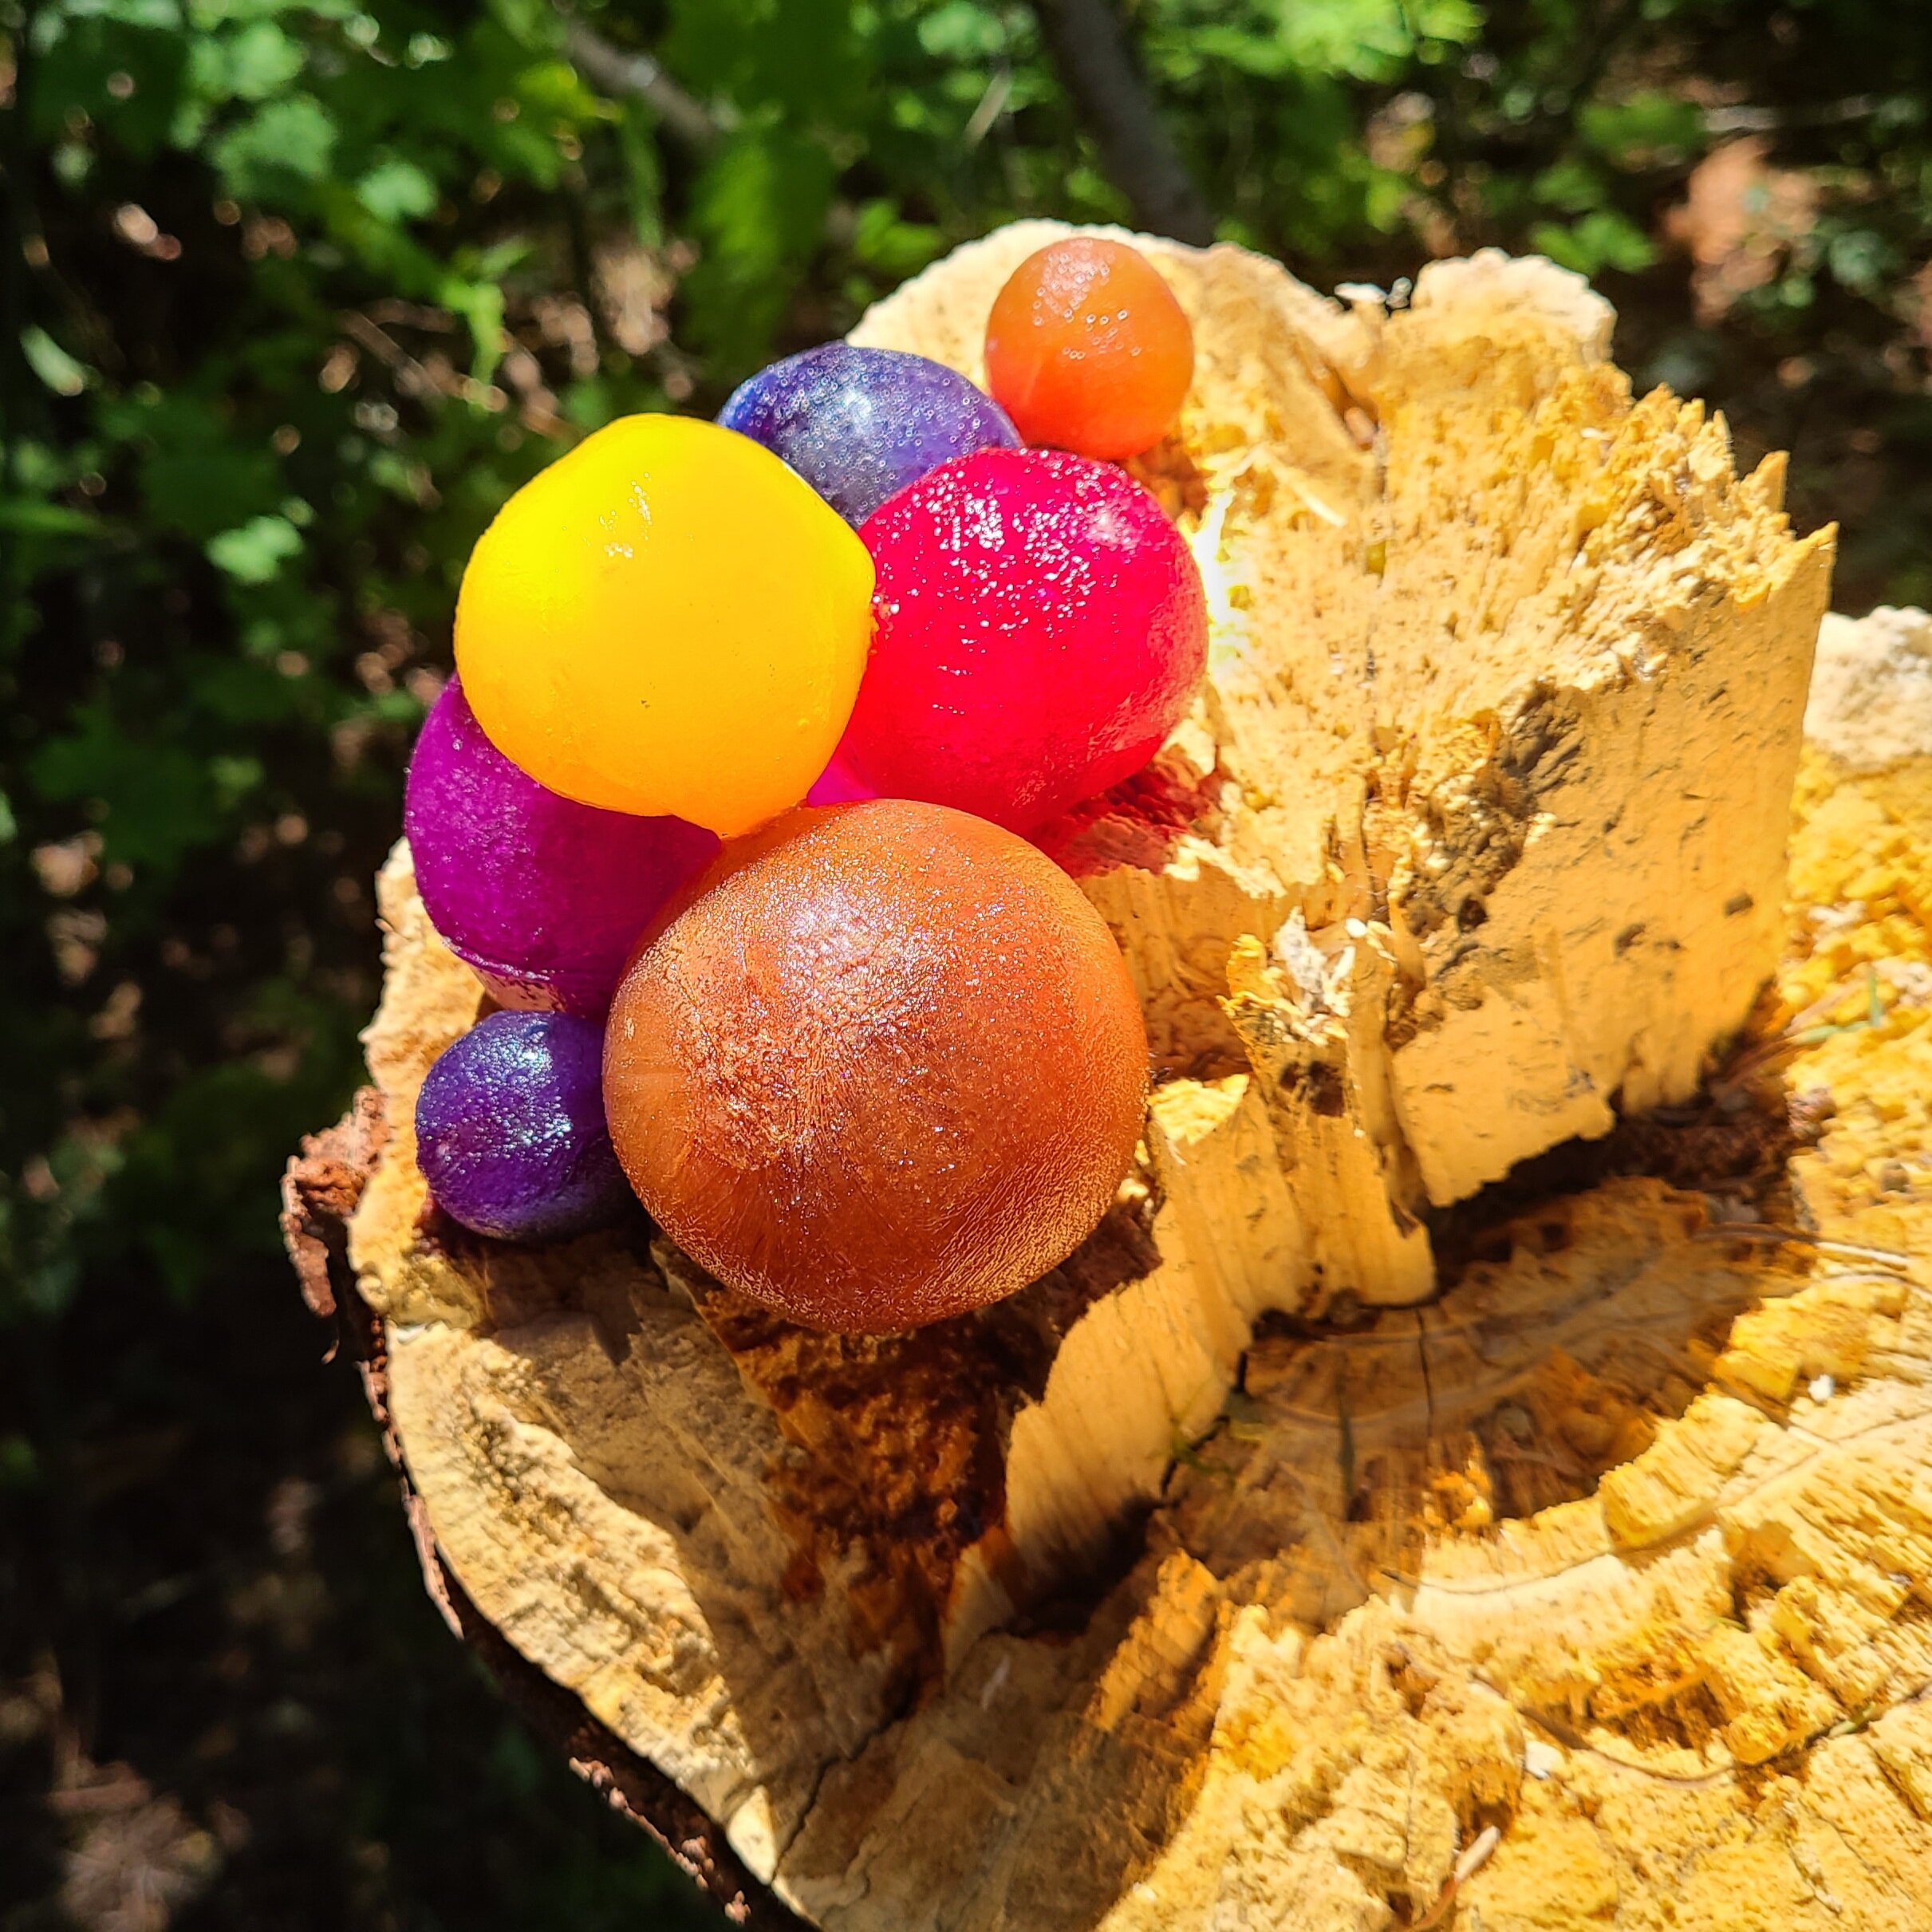
Blazing my way through the thicket meant I stumbled into some of the PNW iconic vegetation: erupting ferns, fuzzy tufts of moss, horsetail reed and skunk cabbage. Such variations of green allowed for creative play that produced a visual tension with the vivid colors of the frozen botanical dyes.

A colorful shoot of ice in the midst of fern fronds.
The woody stumps of fallen trees provided sumptuous textures in a wonderfully neutral palette that also allowed the ice to shine.
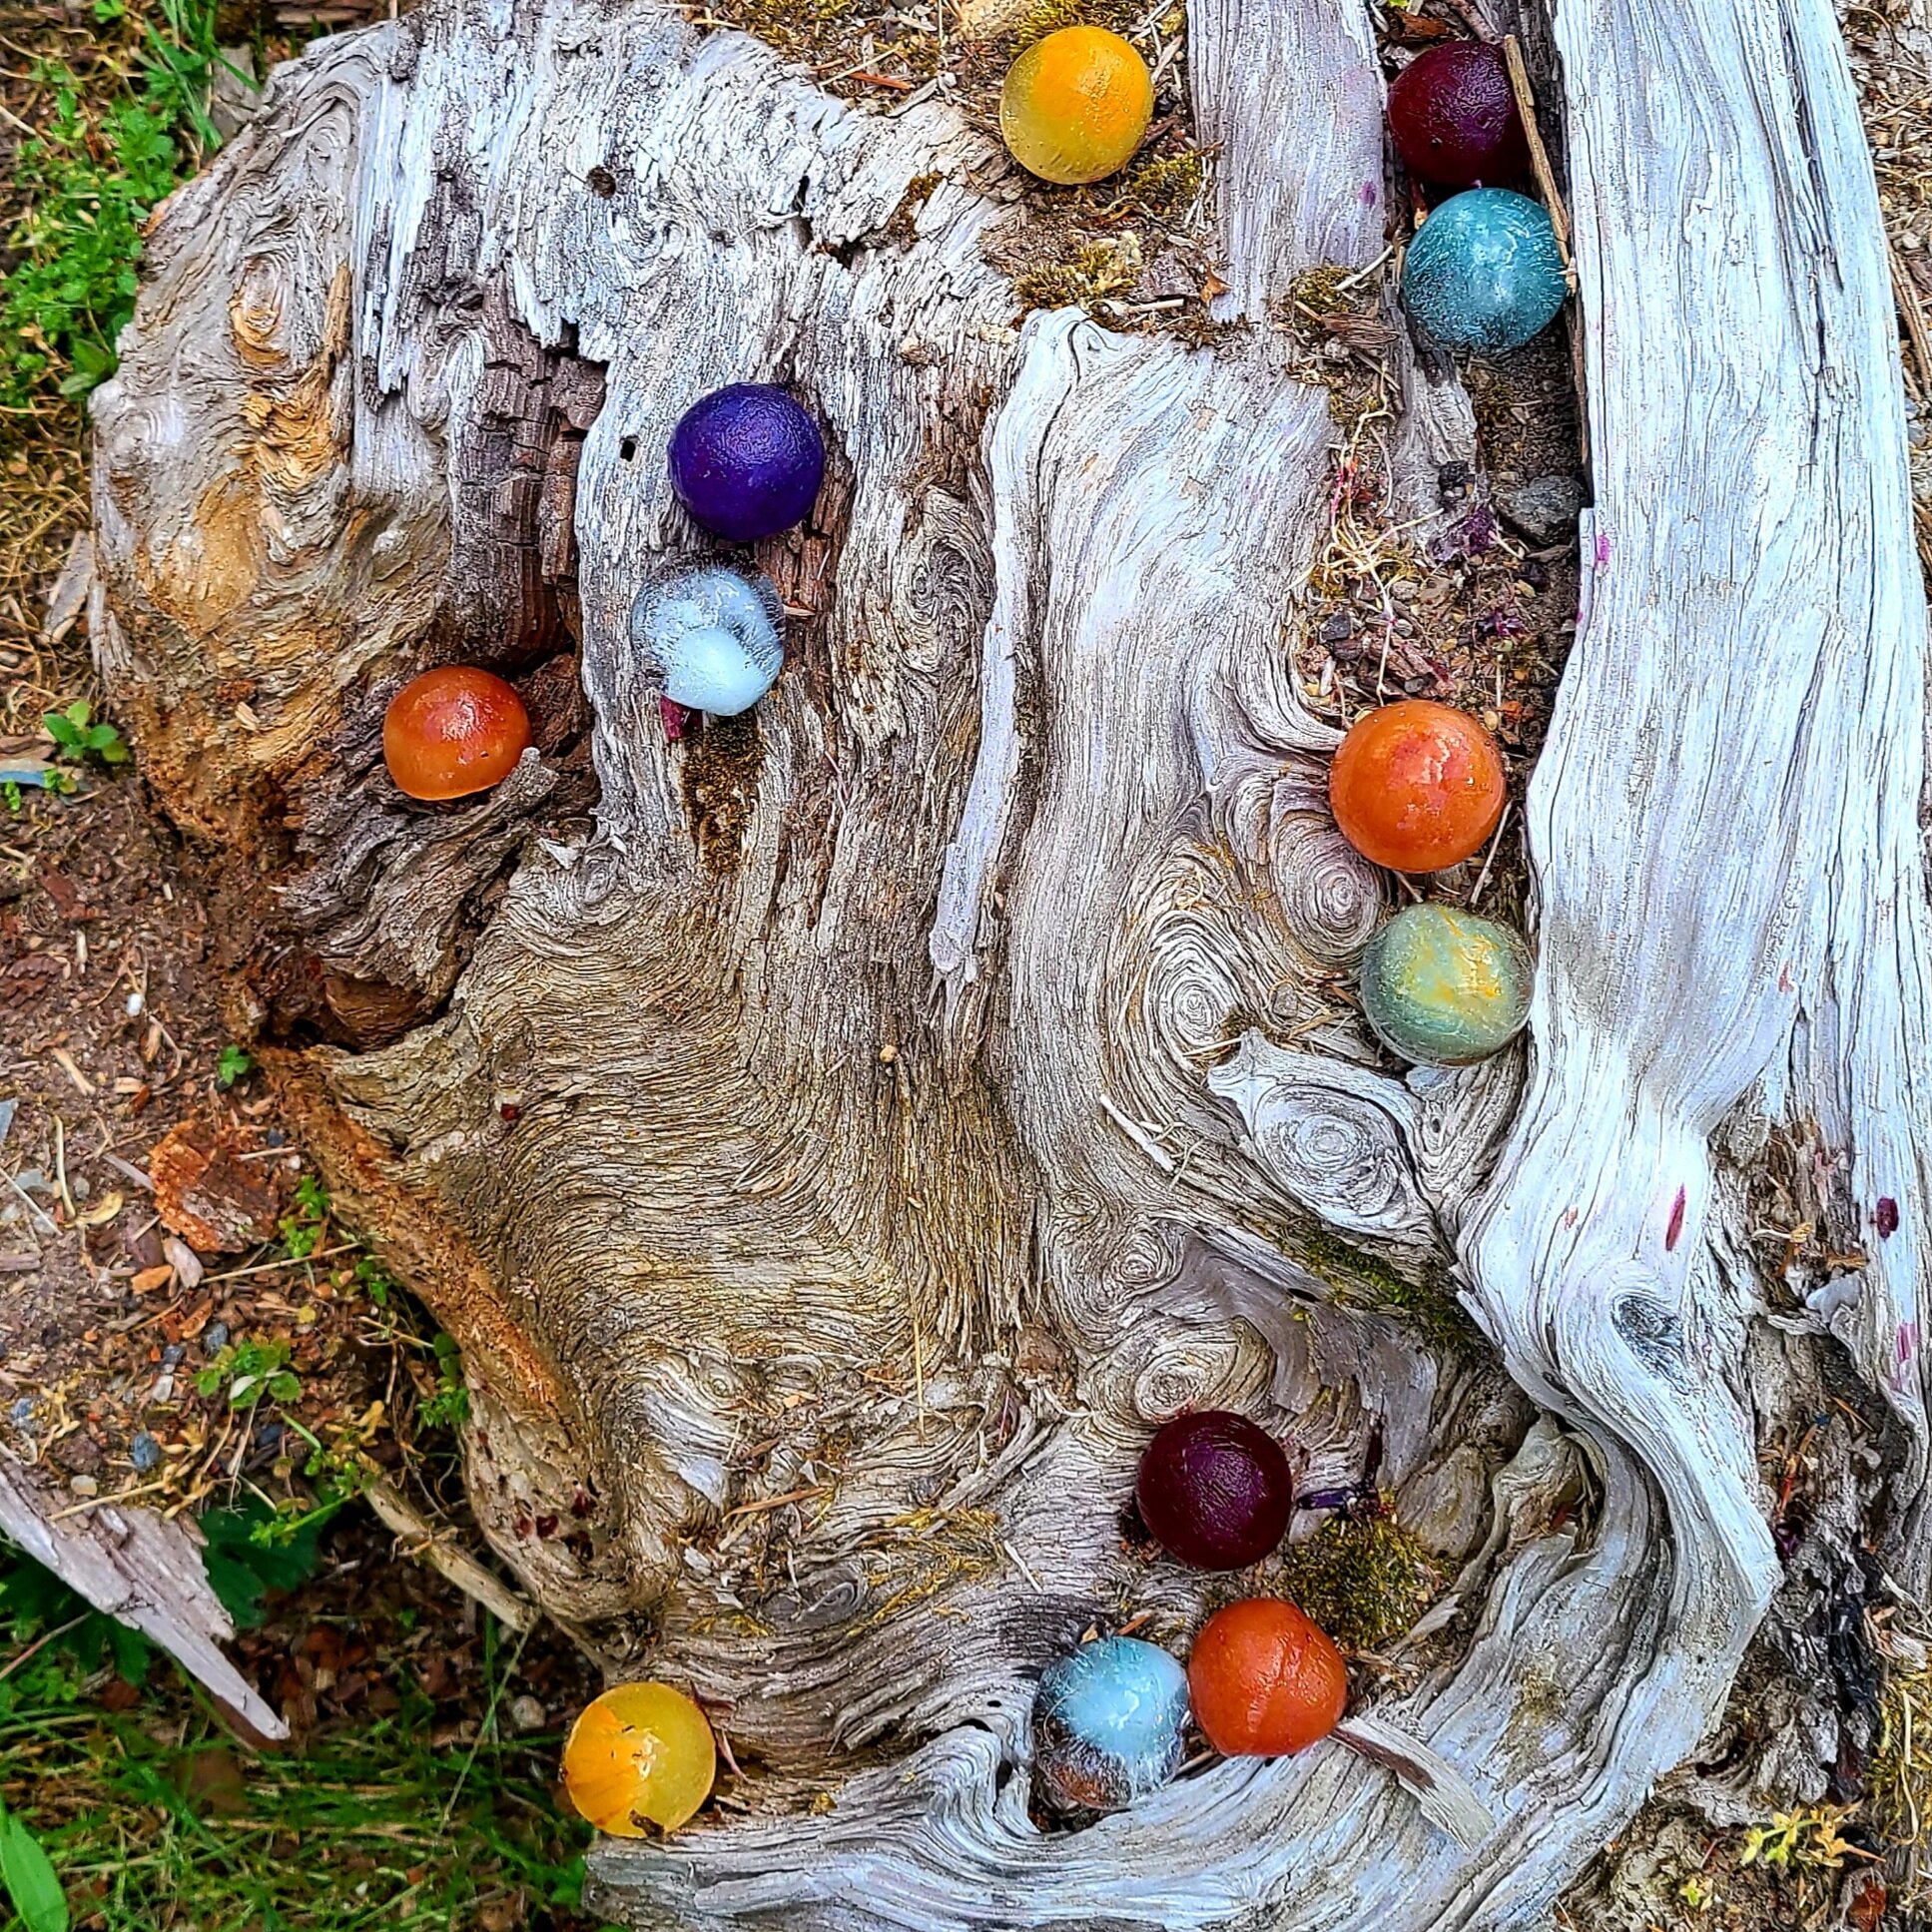
Ice marbles wedged into weathered wood.
Possibly the second most exciting discovery was bumping into stinging nettles. Yes, they left their painful mark on my hand, but without this accidental collision, I would not have been able to identify this weedy herb.

The stinging nettle that bit me during installation will be a welcome addition to my dye pot.
Soon I will head back to collect the leaves because they make the most incredible gray-green dye, a color not easy to find in nature ironically.
Creature comfort
And what would the flora be without the fauna? Hiding among all of this incredible foliage, I was treated to chance encounters with all kinds of animals:
Rabbits flourish here and spring is the time of baby bunnies.
One lone squirrel would rustle in the trees in the same spot almost every day
A bat swooshed just above my head on a twilight installation.
Even a snake slithered its way across my path!
But, the ultimate treat, and yes, THE MOST exciting discovery was a tiny friend who joined me on the very first installation.
The first ice installation in Tambark Park had an unexpected spectator (see below photo).
Thanks to patiently waiting for the streams of sunlight to hit just the right spot, I was lucky enough to catch a glimpse, and a photo, of this sweet tree frog.
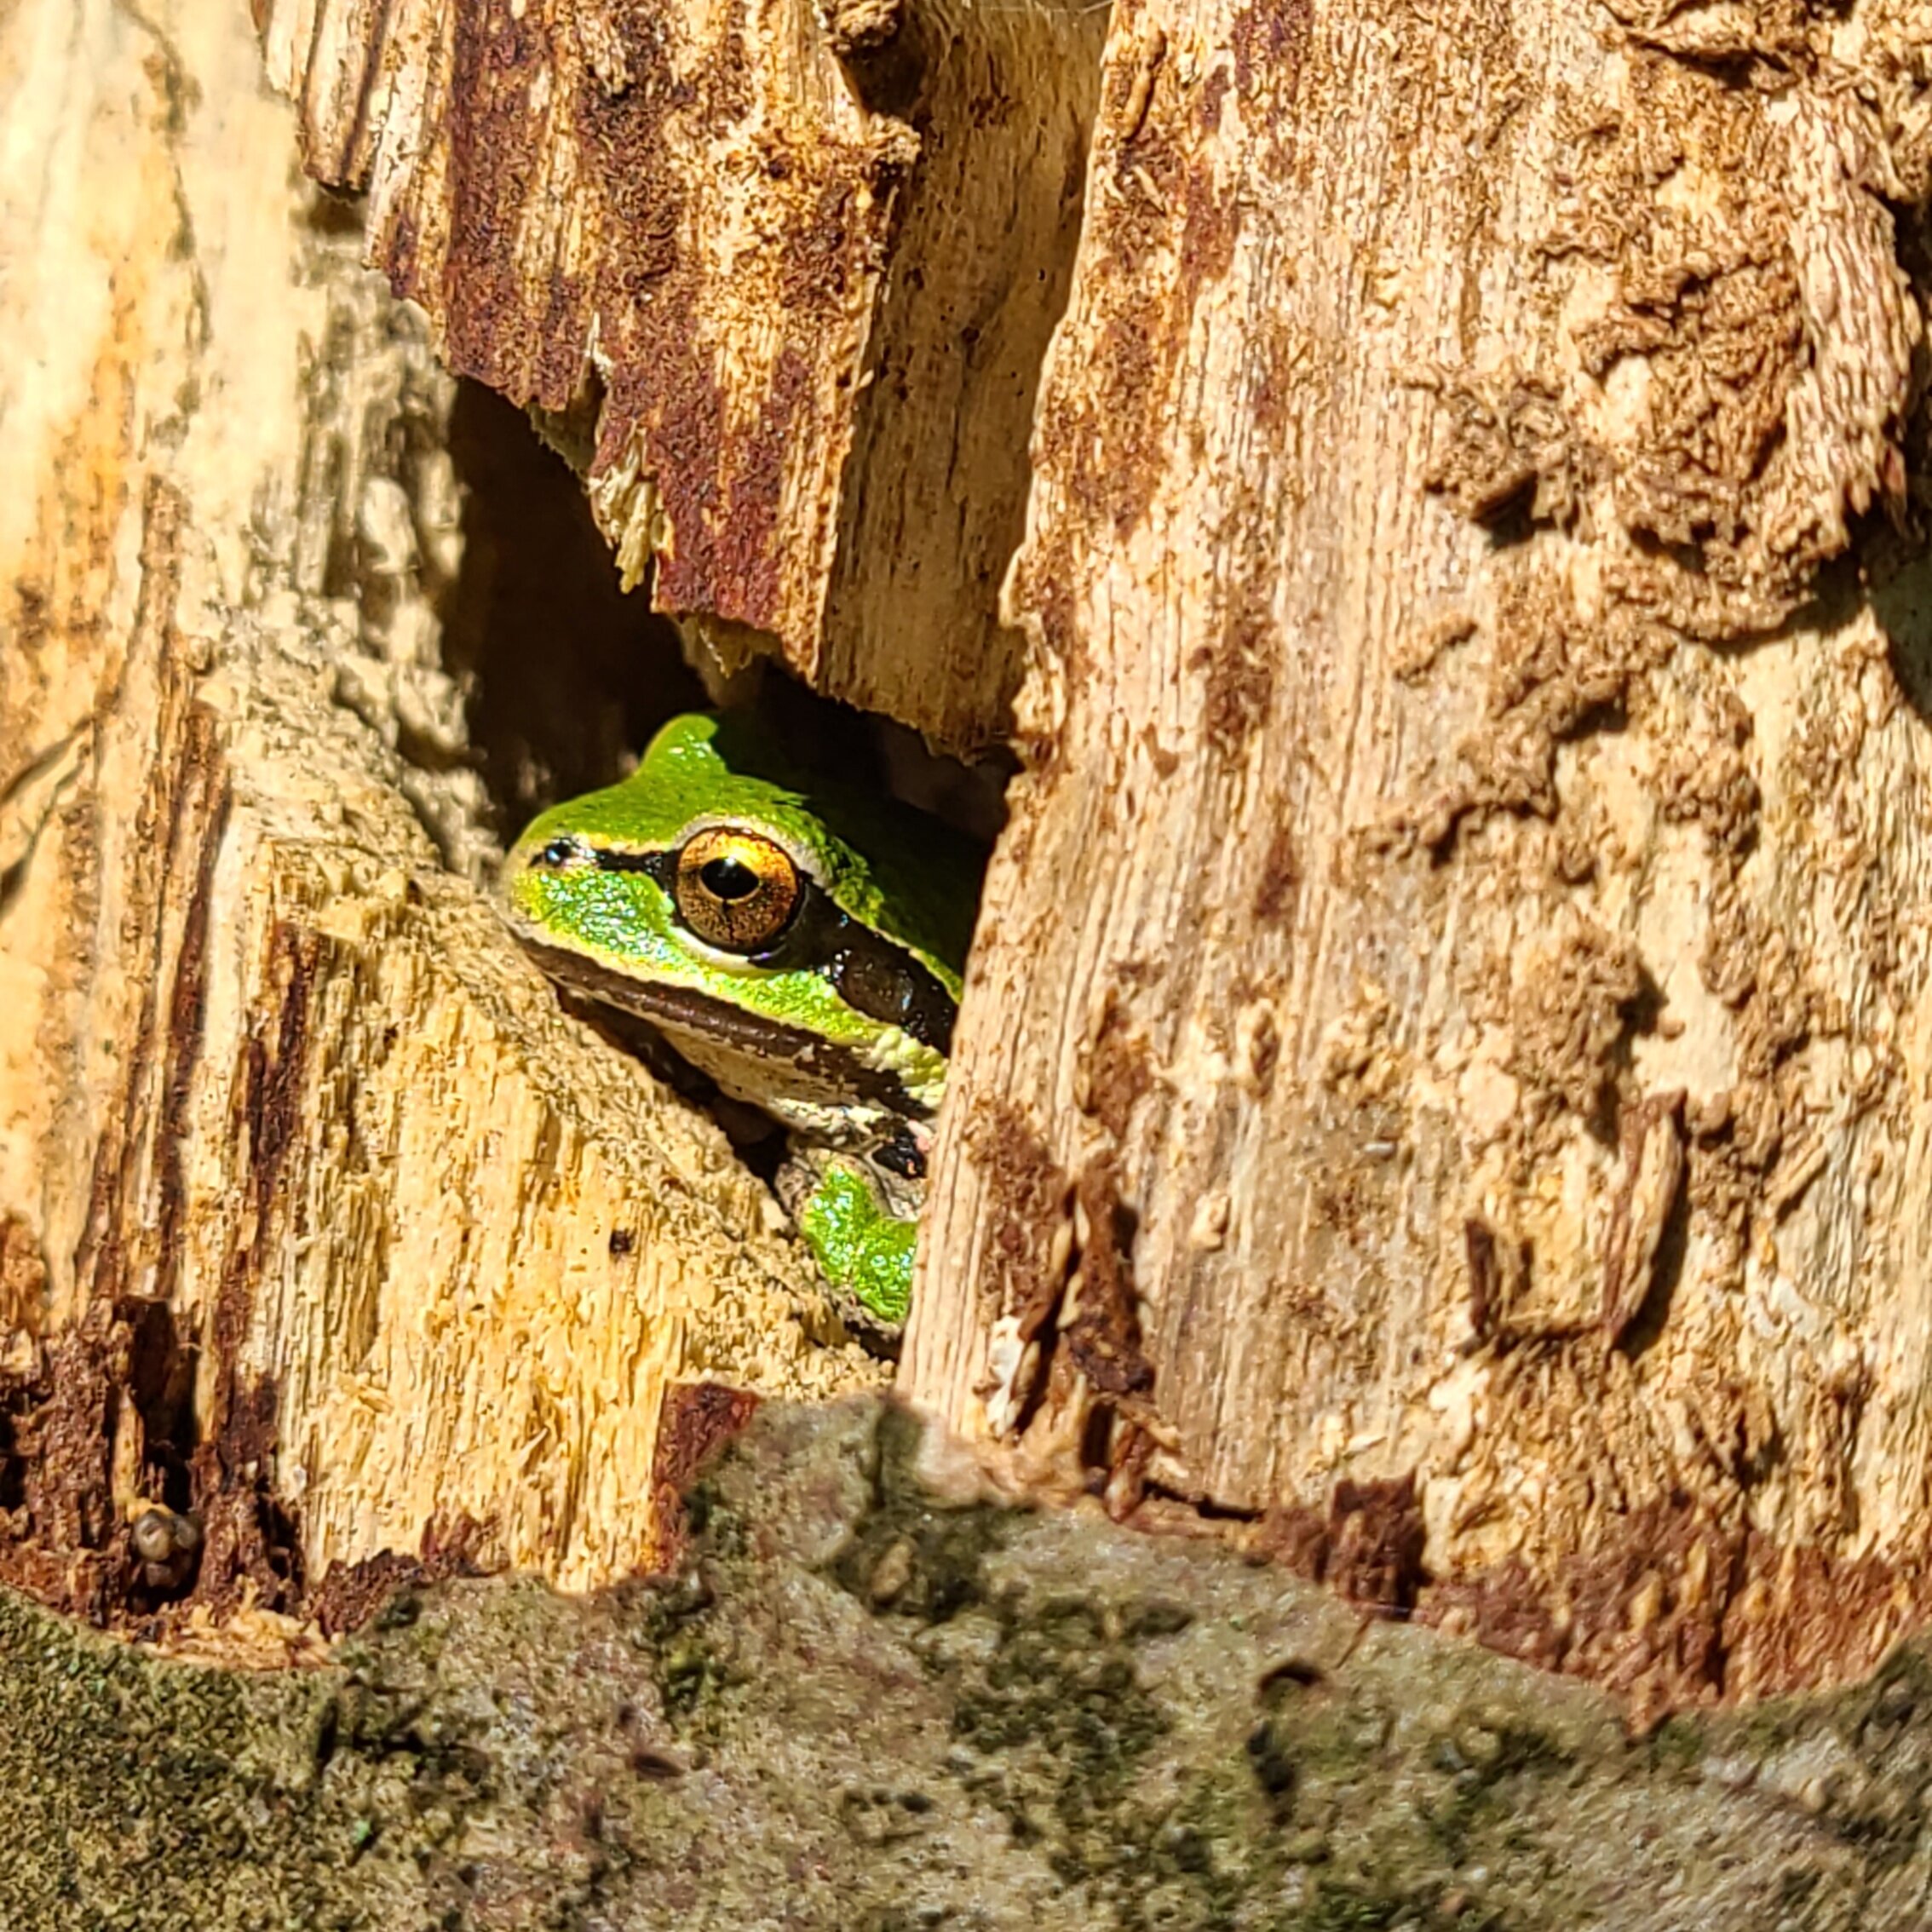
The tree frog who sat quietly for more than an hour while I placed ice and returned to its melted remains.
She didn’t dash away, and even when I returned an hour later to check on the ice melt, she was still cozy in her hole, taking in the afternoon rays.
Ice flow
Where there are frogs, there is water, and Tambark Park has a lowland marshy vibe trickling everywhere. Many a day was spent mucking through spongey ground to install, but I also examined how a stream’s gentle current would dance with my ice pieces.

Mother’s Day ice installation in honor of my mom, Maia, who passed away May 31, 2019.
I’ve played with kinetic energy in my installation work, and certainly the simple act of melting is an inherent trait of mobility in ice.
However, running water provided many more layers of movement to explore: Releasing, floating, bobbing, flowing, dissolving, and ultimately, disappearing.

Frozen floats of organic dyes in Tambark Creek gone within minutes of placing this installation.
Movement, in fact, may be implicit in the ephemeral – an idea I am just now realizing.
Micro-living
Ten tiny days of micro-travel has had a macro-impact on a deeper understanding of my creative practice. Slowing down to open the senses to my immediate surroundings has brought wide open space for reflection. Yet again, I’m reminded that movement can be a collective effort of small steps, as long as I actively nurture its momentum.
10x10
Natural order
I’m a big fan of squares in my art.
To be more accurate, I should probably broaden that statement to say ‘I love parallelograms’ because rectangles and rhombi pop into my artwork as well. Since a square is a kind of rectangle and rhombus, but neither a rectangle nor a rhombus is necessarily a square, I may want to be more inclusive of the linear shapes that have inspired me for decades.

All kinds of naturally dyed parallelograms playing on this canvas!
Side note: Can you tell that I’ve been tutoring my son, Mason, in geometry this spring?
So, as I sat down to write this month’s Trail Tale to share my journey into #The100DayProject, I realized I was playing with squares again. Only this time, in an algebraic way: 10x10=100, or more simply written 10².
Projection
When mixed media artist, Natalie Dadamio, suggested I try #The100DayProject this year, I thought it would be a fantastic way to deepen my commitment to my creative practice. Knowing I would be grounded from travel, at least of the air variety, diving into 100 days of a focused art ‘project’ seemed like a wonderful way to enrich the time in my home studio.

We used to have a kitchen island, but that real estate is now gone, along with the dining room table.
But why 100 days, and how would this differ from the extensive hours in the ‘off-hours’ that I’ve already heavily invested in this crazy creative biz dream of mine?
Seems the consensus is as follows on the power of 100 days of focus:
It is long enough to create a habit
It is short enough to see the finish line
It requires setting an achievable goal
It demands planning to allocate time and space
It is extremely helpful to break it up into manageable micro-steps
Coincidentally, three of my 2020 goals are hovering right now in the 100 day range. Making healthy nutrition choices, increasing movement and meditating have become daily habits. Ways of living that seemed to elude me throughout the years are wonderfully entrenched in my world today.
And, I’m at least 10x10 times happier.

All smiles on the cochineal farm in Oaxaca, Mexico, March 2020.
100 days of art….bring it on!
Hash it out
First thing first was to decide what my 100 Day Project focus would be. As you may have noticed, I suffer from a kind of creative distraction disorder. My artwork crosses all kinds of discipline and medium lines as my curiosity drags me from one to another and back again.
So, how was I to choose just one of my many passions?
Easy: #100DaysOfMultiPassion
But, in an effort to corral those multi-passions of mine into a more cohesive project, I needed a theme.
One idea came to me naturally: #100DaysOfColorsFromNature

The rainbow of mineral pigments I foraged while on residency in Oaxaca, Mexico, March 2020.
Now, with not one, but two hashtags declaring my project, there was one tiny manageable micro-step I had to take.
Breaking it all down by 10.
Chunky monkey
As I hit publish on this blog, I’m about to celebrate my 25th day – one quarter done! For those of you following my adventures on Instagram, you have had a preview of where these 100 days are meandering. For those of you on Facebook – sorry!
Breaking the project down into 10 days each of 10 different ‘topics’ surrounding natural color felt like the perfect solution to keep me on task. Plus, I argued, it would allow me to truly explore all of the ways nature’s palette has inspired my art.

Pigment color studies from the regions of Peru where we explored and foraged in June/July 2019.
If you’ve read this far, you are in for a sneak peek of the full 10x10 plan. Plus, I’ll throw in a little commentary and few more photos of chunks 1 and 2 (Days 1-20) which have already flown by:
Days 1-10: Natural dyes
I may have started using organic colors in ice, but the list of materials I have dyed from nature also include textile, paper, bioplastics and even eggs. I may have left out mung bean and dough in this project, but I added a new piece to the dye mix – ink!

Cookin’ colors in the kitchen to make inks from red cabbage, black bean, avocado skins and turmeric.
Days 11-20: Mineral pigments
Over the past 1.5 years, I widened my color scope to include the earth beneath my traveling feet. Each day, I shared some of the subtle hues I foraged from 7 unique locations: Washington, Idaho, Oregon and California on the west coast, Pennsylvania to the east and Mexico and Peru to the south.

Pigmented stones foraged along Wissahickon Creek in Philadelphia, PA, July 2019.
Days 21-30: Textile colors
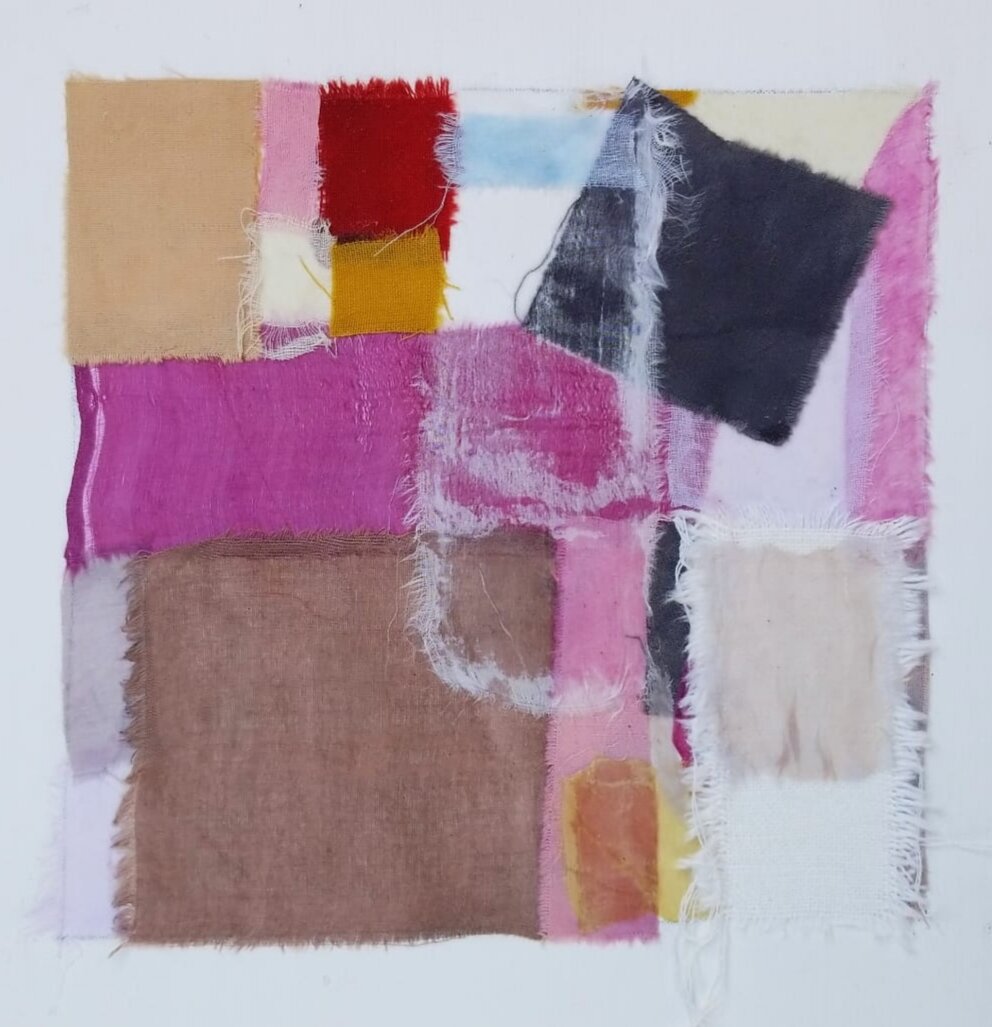
I’m midstream in the 3rd chunk and creation is underway. Every day I’m building a quick color study with textile remnants I have collected from larger pieces I built in Oaxaca. The idea is to push the design from a limited natural palette in a small space.

Textile Stack Series of quick color studies during #The100DayProject. Drop me a line to purchase.
If you want a piece of the action, each one of these mixed media works on canvas is for sale at $40.
What a steal of a deal!
Now the next 7 chunks are part of the plan, but I reserve the right to make adjustments along the way:
Days 31-40: Installation – I will place 10 new naturally colored sculpture clusters within 0.5 miles of my house.
Days 41-50: Oaxaca Minis – I will build 10 new 8x8 textile works on canvas from the full Oaxaca color range.
Days 51-60: Bioplastics – I will brew up all kinds of wonder with gelatin, algae and botanical dyes.

Translucency and botanical dyes all wrapped up in bioplastics.
Days 61-70: Monoprints – I’ve wanted to explore this technique, so I plan to create 10 pieces using only natural colors.
Days 71-80: Three shape challenge - Textile
Days 81-90: Three shape challenge - Monoprint
Days 91-100: Three shape challenge: Installation
Let’s just say the last 3 chunks are meant to hold my feet to the ‘simplicity’ fire.
The same artist who enticed me to join #The100DayProject (Natalie Dadamio), also challenged me to ONLY use three shapes in my work during the 100 days. I figured 3 chunks totaling 30 days fit perfectly into the 3 shapes theme.

The 3 primary colors very cooly represented by turmeric, red beet and blue butterfly pea infused ice.
These three are for you, Natalie!
Cubism
Riding shotgun to my 100 days, Mason has found a teeny space for his geometry book on the dining table that is now smack dab in the middle of my studio, aka our kitchen.
We started solving for volume this past week. All of the 2 dimensional shapes have introduced their 3 dimensional siblings: spheres, cones, pyramids and cylinders.
And yes, the glorious square is full of pride and flaunting its cube cousin just to make me smile!
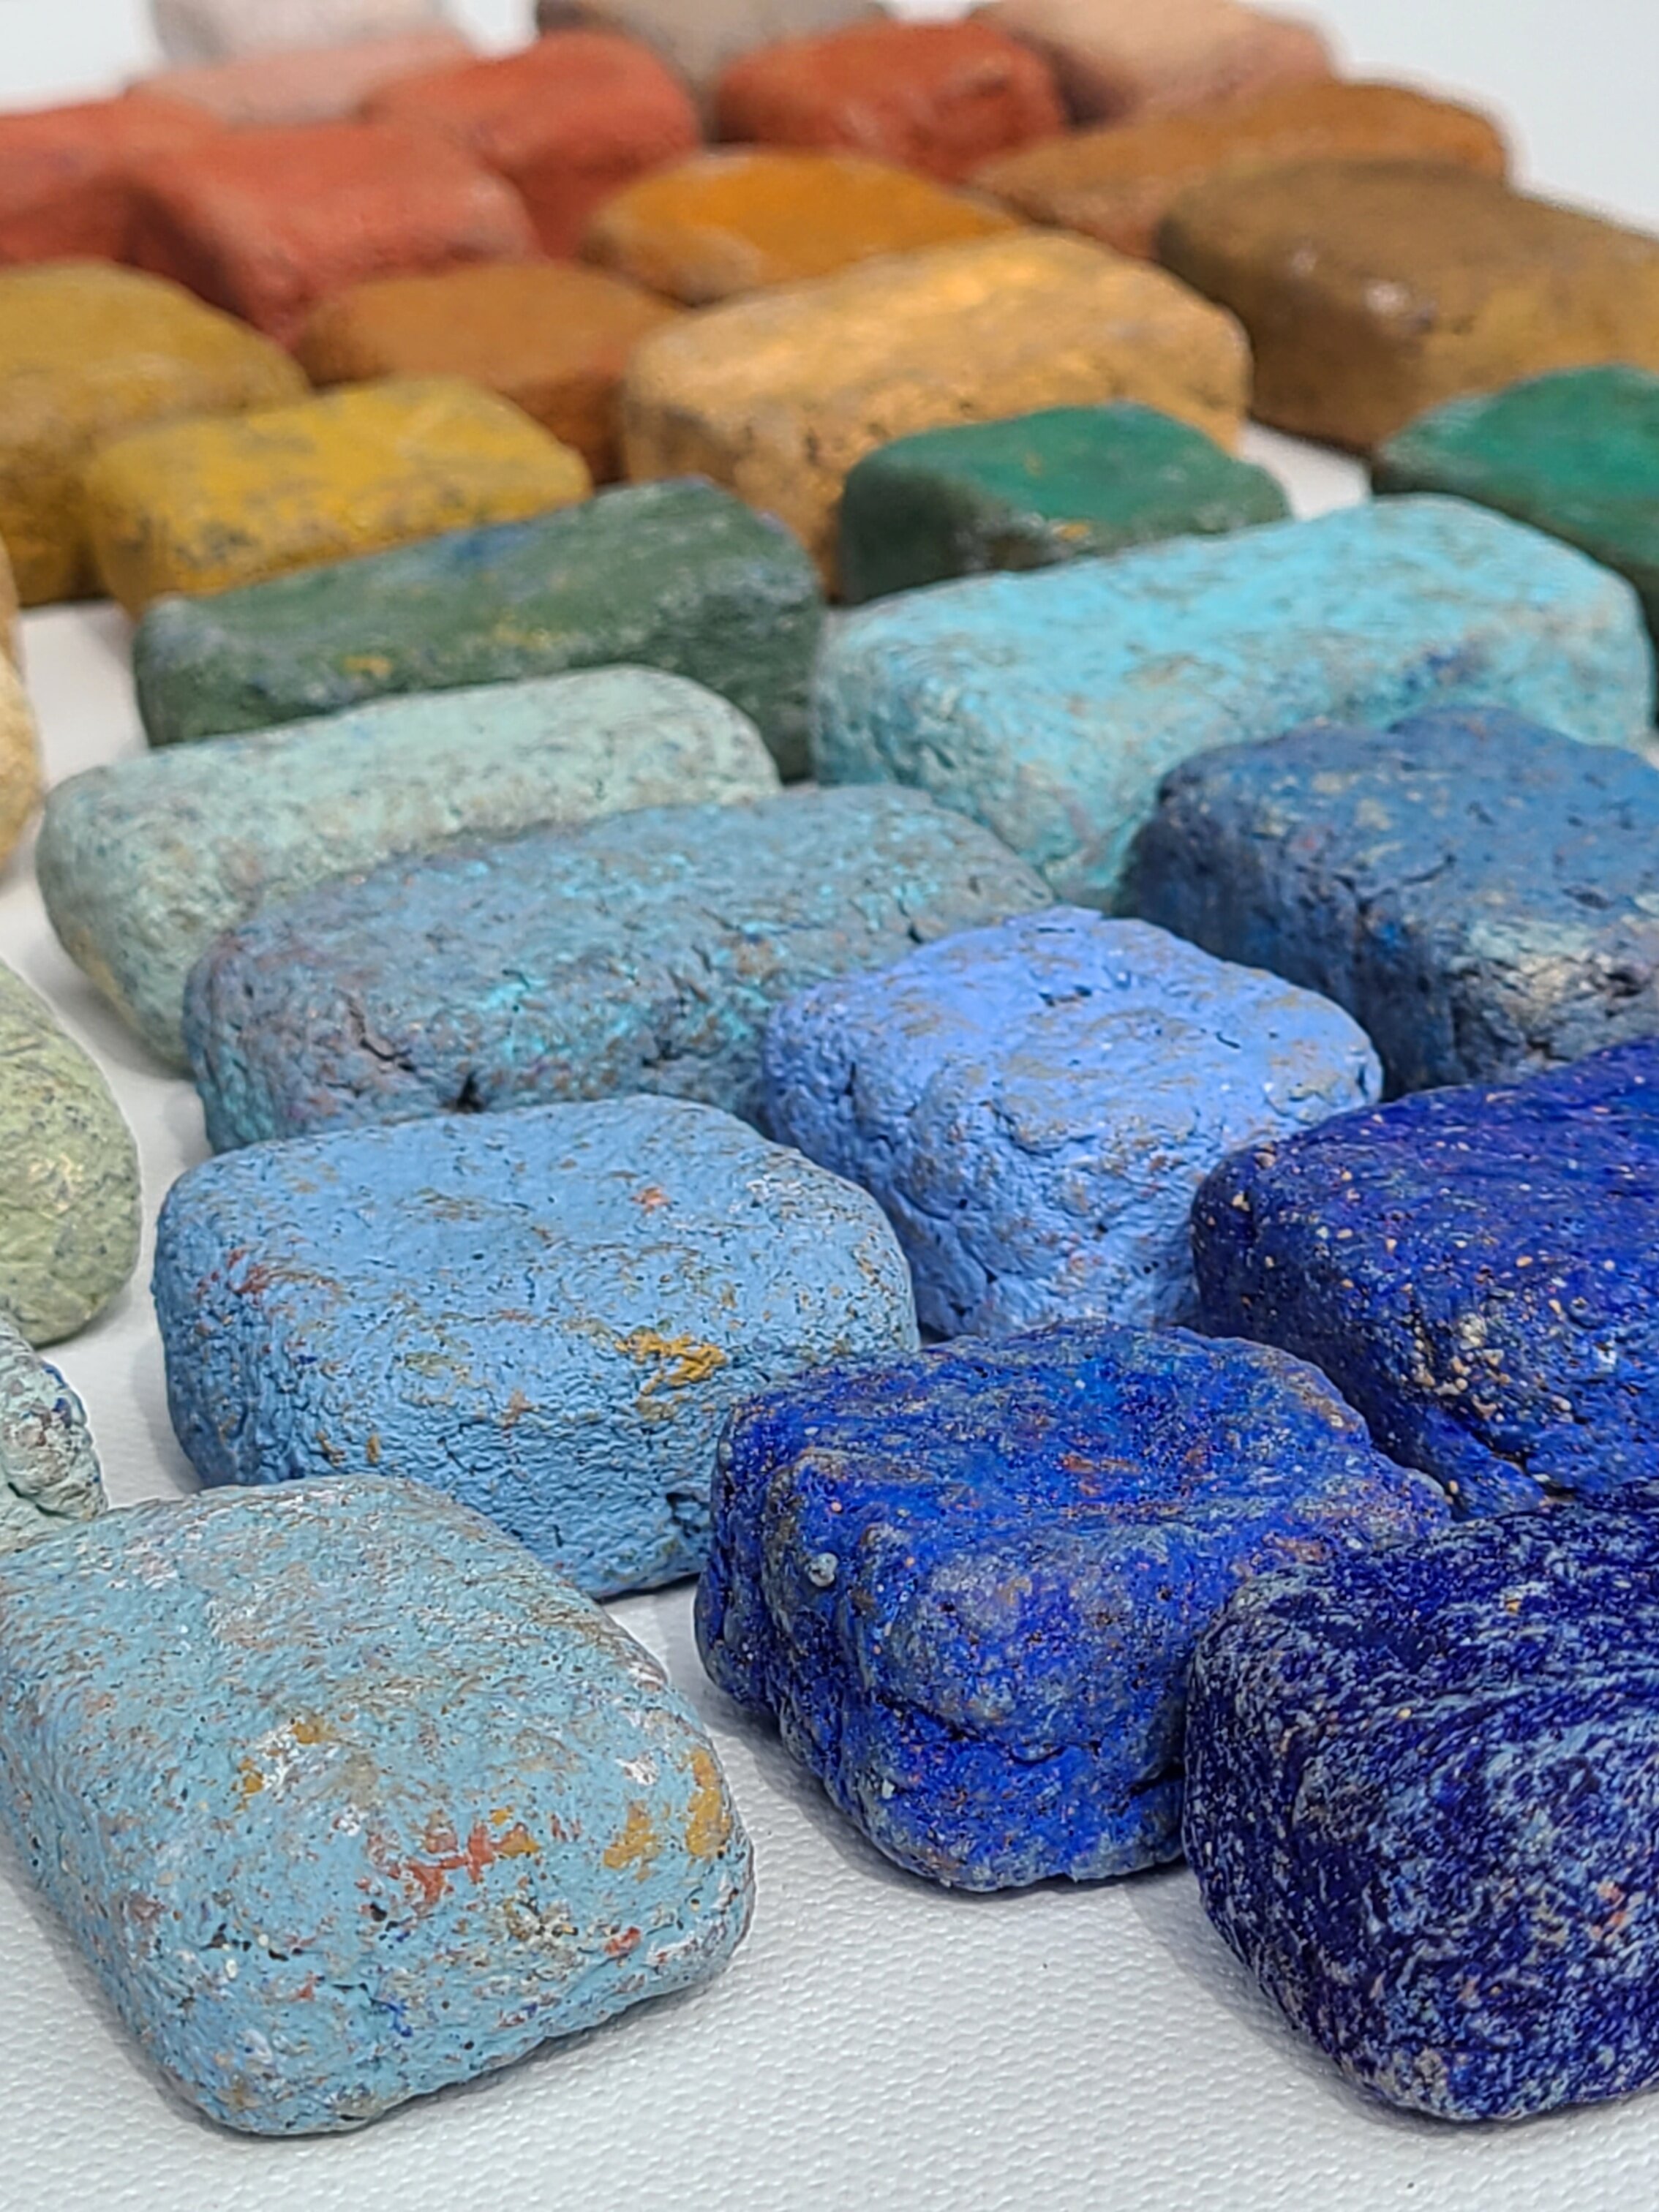
My trusty installation travel buddies: earth pigment painted paper pulp blocks. Stack ‘em up!
I sure do love cubes…naturally.
Beyond Measure
For good measure
One of my new favorite sayings is ‘you can’t manage what you don’t measure’. It is a gem of Peter Drucker’s thought that I’ve applied to just about everything in my life recently:
The food I’m eating, particularly the sugar (cause of most evil in the world!)
The growing number on my email list (many, many thanks to all of you!)
The distance and length of time of my daily walk (finally a habit!)
I’m sure I’ve annoyed my closest friends by spewing this wisdom a few too many times.
Funny enough, measurement is strangely absent from much of my creative practice. My tendency is to eye it, guesstimate, and just plain wing it most of the time. The result is an inexplicable delight of the unknown.
Will it work? I never know, but I trust the surprise I may stumble upon is often better than any measured steps I could have meticulously planned.
Bob Ross calls these happy accidents, and I’m perfectly content crashing into some of my most beloved creations.

Bumping into the one and only Bob Ross at the Funko headquarters in Everett, WA 2019.
Drastic measures
Having a happy accident in art school may have started this trend of semi-controlled spontaneity. It is an example I speak of often, and I believe I may have even mentioned it in a Trail Tales blog of yore. Forgive the repetition, but I suppose that is how what we learn can truly sink in.
At the University of Montana, the Ceramics Department is world-renowned, many thanks to the unique work of Rudy Autio that pushed the conventional boundaries of clay. As a BFA student, everyone is required to take Ceramics 101 at the very minimum.
One of the beautiful slices of U of M art school is that it was the most welcoming, inclusive, non-competitive and encouraging environments I have ever experienced. I count myself extraordinarily lucky as I understand this experience is not always shared among other BFA programs.
Walking in as a complete newbie, I was wowed by the amazing work being produced by the graduate students, and incredibly inspired to bumble my way through an art form that has its roots in measurement. My professor, Beth Lo, was kind and generous in sharing her knowledge of this ancient art form, and I honestly tried to follow all the steps on each project we were assigned.
Honest.
Our final project was a chance to design anything we wanted to be saggar-fired in a vessel we built ourselves. As my 3D intrigue was beginning to bubble, as well as my installation curiosity and unexplained love of all things square, I knew exactly what mixed media magic I wanted to create, and I quickly sketched the design and built a board to describe my vision.

One of my BFA thesis mixed media pieces used in an installation. This was the vision I had for my ceramics project.
When Professor Lo pulled the vessel from the fire, she warned me that I would be extremely disappointed in the result because it was nothing like what I had planned.

The center piece of the biggest mistake in my art career, 1995.
True, the 5 cube forms were not the smooth porcelain surface I was after, nor the rusty colors of the earth. They were a bubbly mess of grays and blues with ashen edges. My idea of embedding polaroid transfers into the center square was quickly washed away by residual globules of mis-measured glazes that had an unexpected combustion soirée in the kiln.
I was blown away, smiling from ear to ear, because I could never have planned such surprising beauty. At that moment, my professor told me I would be well-suited in the wild world of art.
Measure up
For the past two years, I have become passionate about extracting color from nature. Much of this was driven by a desire to use only organic matter in my installation practice, particularly when leaving a piece of art to dissipate into the earth.
Starting in my kitchen, I began brewing colors from spices and vegetables I found in my cabinets and fridge. From there, I became curious about foraging for botanicals and experimented by creating dyes from seaweed and lichen. My longstanding love of stone lead me to the world of minerals and earth pigments. Yes, I am officially addicted to the quest for a natural palette.

The colors of the rainbow courtesy of Moonstone Beach in Cambria, CA.
And, the exploration continues. Today, I am writing from my artist residency studio in Oaxaca, Mexico, a global center for textiles and botanical dyeing. My intention is to learn by doing with hands-on instruction from a dye master of the region, as opposed to my stand-by instructor known as the internet.
How will things measure up?
In short measure
As I’ve quietly entered the wide world of natural dyeing, I’ve become acutely aware that ratios, weights and recipes are quite important in assuring a desired color result. I have the utmost respect for the long history of passing precise knowledge from master to pupil. Beyond that, I am humbly grateful to have the unique opportunity to simply learn about botanical dyeing.

My master, Manuel, teaching me the Zapotec dye tradition from the Oaxacan region in Mexico, Feb 2020.
Manuel, the dye master in my residency, has shared many local practices along with some practical advice about what to avoid:
Don’t let your dye come to a boil to avoid losing the colorant to vapor
Don’t brew your textile with your botanical material to avoid splotching
Don’t let the textile touch the bottom of the dye pot to avoid color variation
Don’t stray far from the ratio of plant-to-water-to-textile to avoid weak color saturation
Don’t dry your fabric in the direct sunlight to avoid quick color fading
All of this makes perfect sense in the world of order and consistency, but as Manuel noted, none of it is a guarantee of color perfection to match your mind’s eye. It’s Mother Nature’s job to figure that out for you.
With this wisdom, I believe I’m perfectly suited for organic dyeing. The joy I experience is in the unique variation of color that nature chooses to surprise me with every single time.
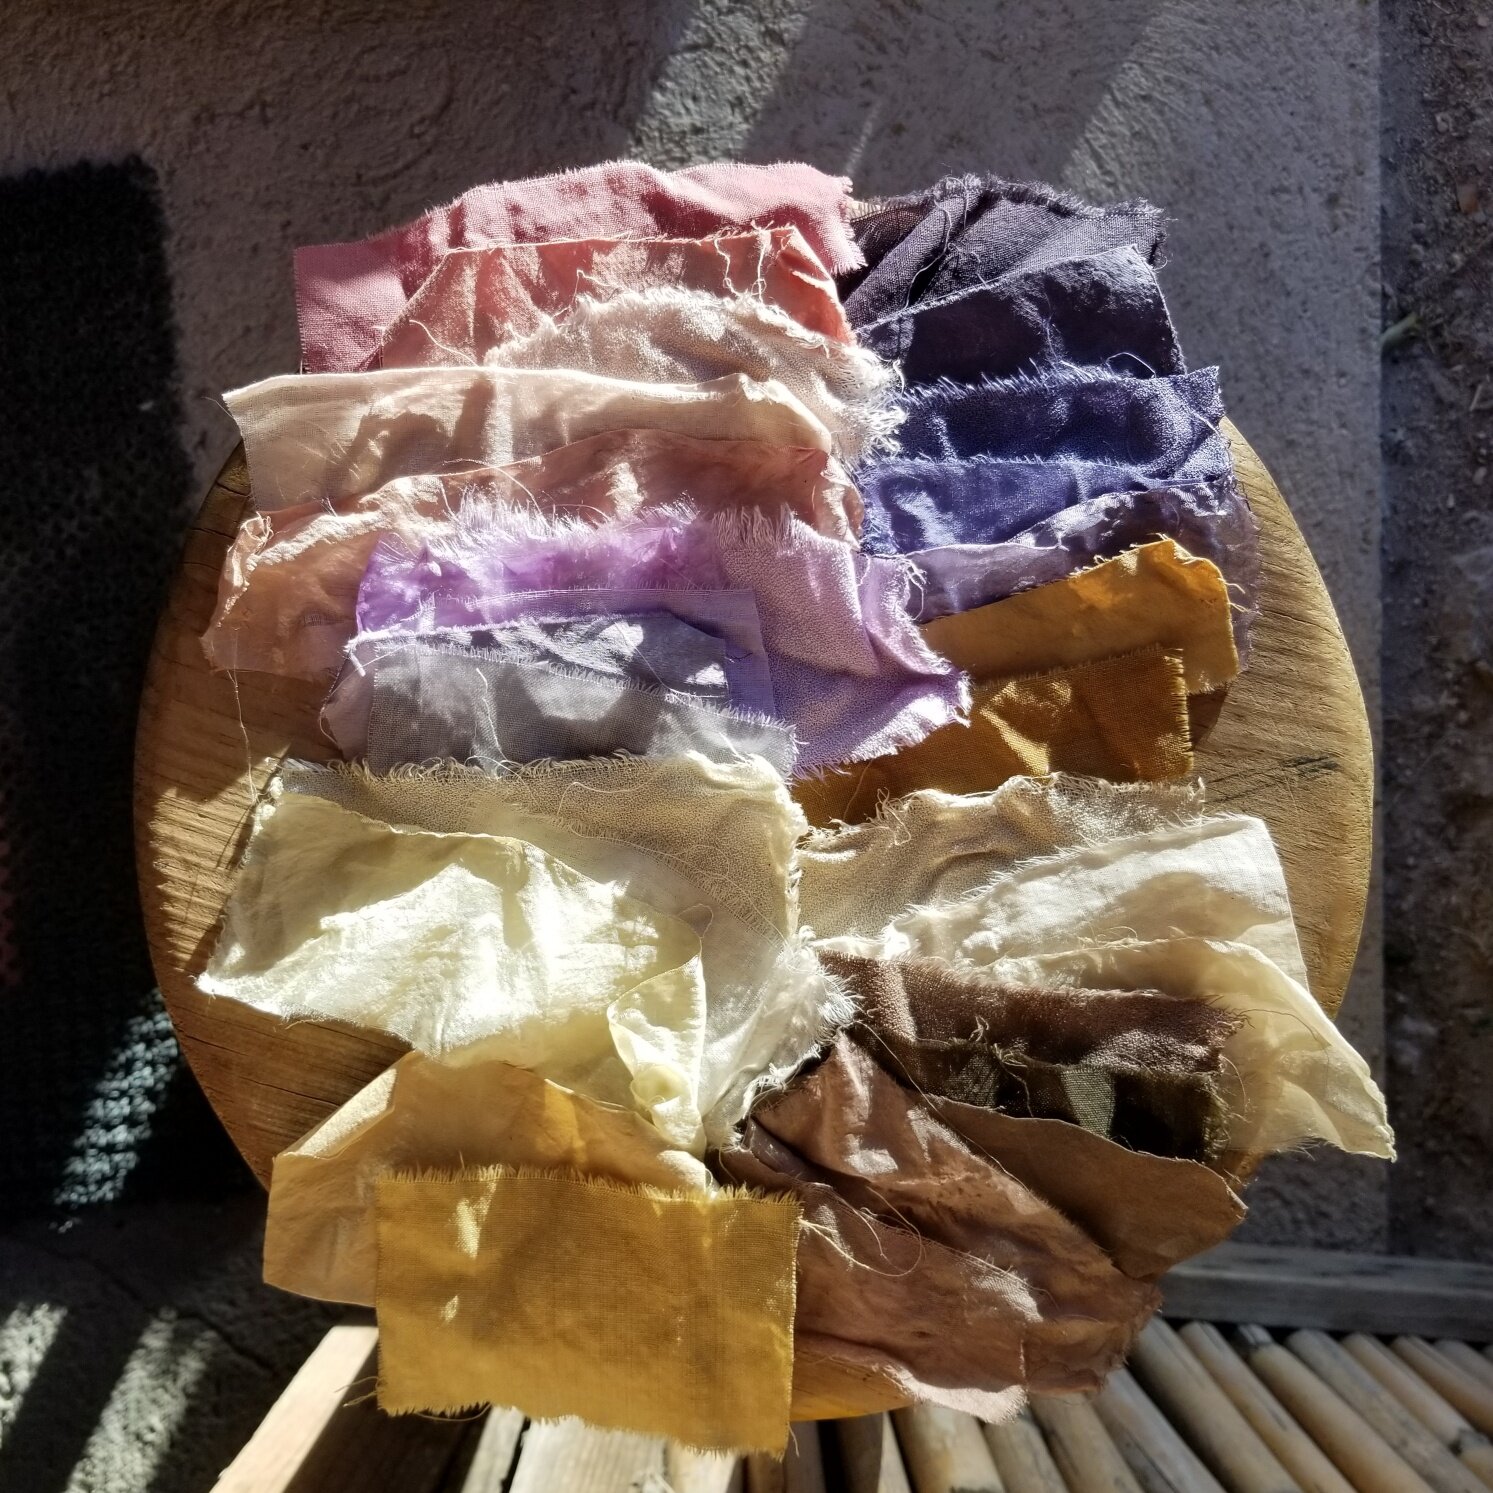
First color swatches in my residency studio with textiles brought from the US and NL. Excited for the wool yarn soon to dye at the farm with Manuel!
In fact, I hope to never dye the same color twice, and splotches – bring ‘em on!
In equal measures
On my mantle, I lovingly display the biggest mistake of my BFA program, and my most cherished piece of art. These explosive cubes of clay are a constant reminder that although measurement is important, celebrating the unexpected is the spark of life.
Wonder what color surprises Oaxaca holds for me the next few weeks? Stick around for the big reveal in next month’s Trail Tales!